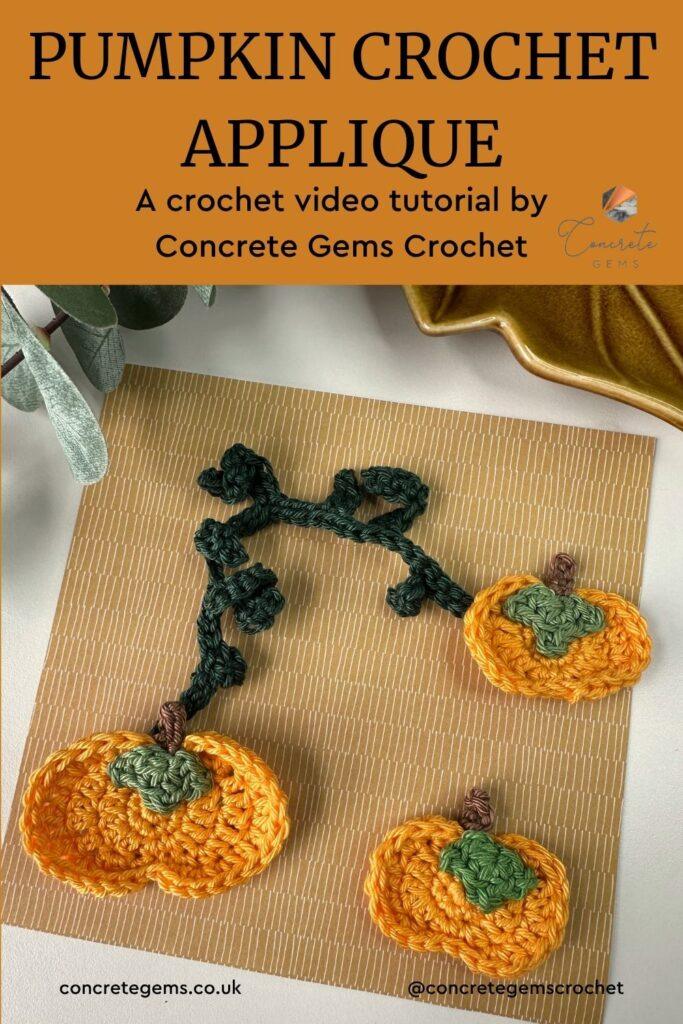
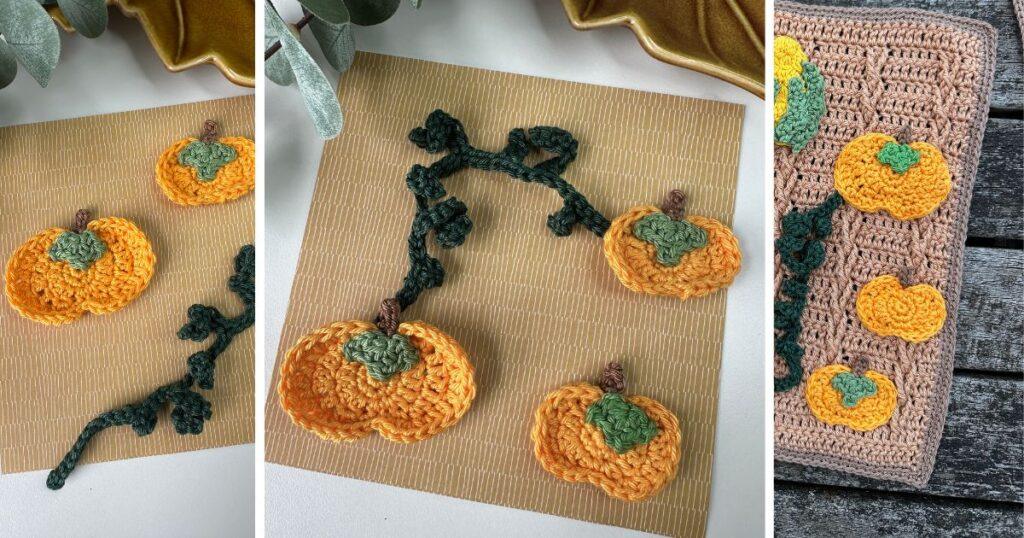
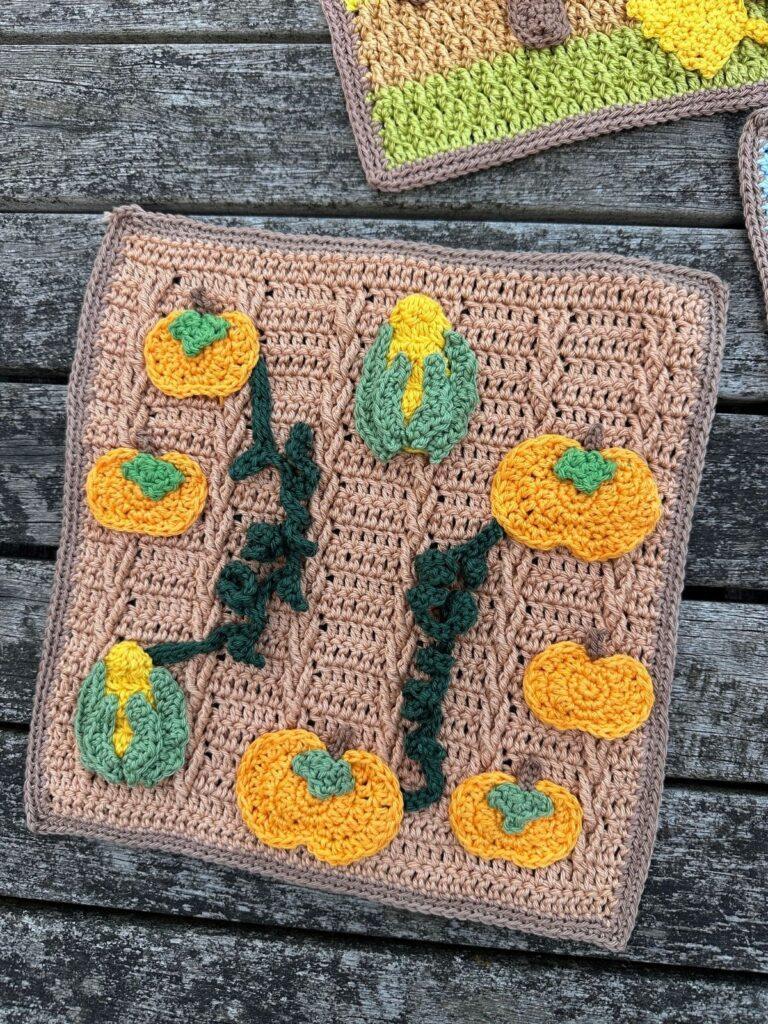
Nothing says autumn quite like a pumpkin, whether it’s piled high at a farm stand or carved on the doorstep. This pumpkin crochet appliqué pattern gives you two sizes to play with, plus a trailing vine to tuck around them, so you can build anything from a single tidy pumpkin to a sprawling patch.
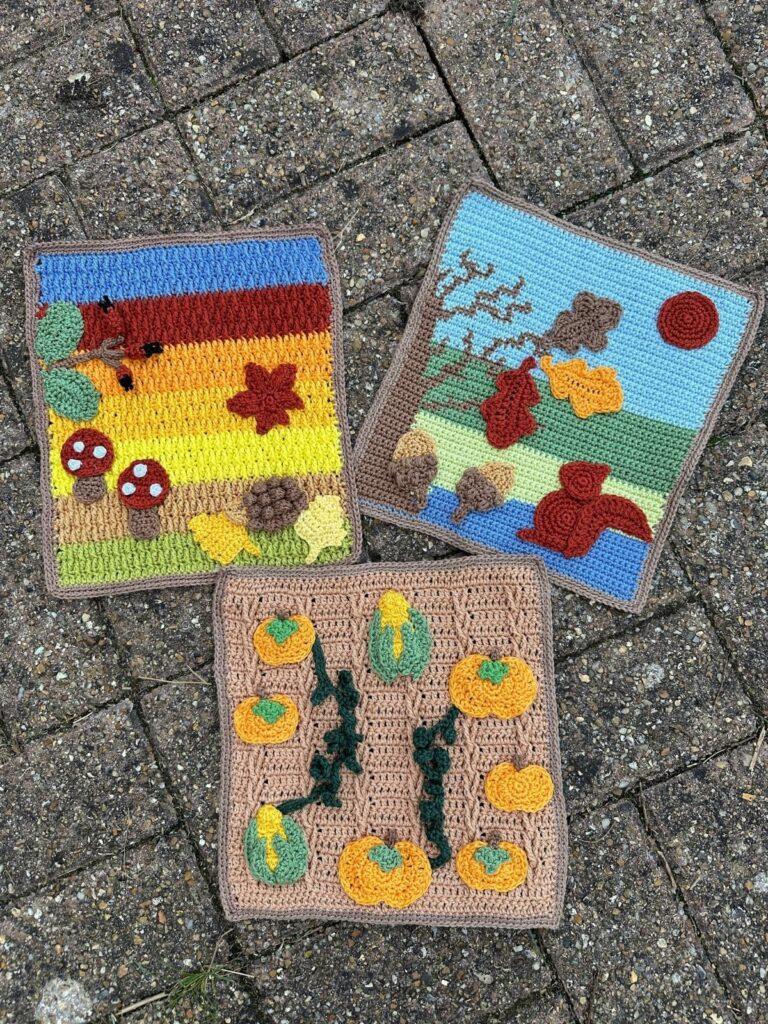
It’s one of the appliqué motifs in my Autumn Landscapes Crochet Picture Set, but it’s just as at home stitched onto a jumper, scattered across a blanket, or used in a design entirely your own.
Disclosure: This post may contain affiliate links. This means we may receive a commission if you click a link and make a purchase. However, this does not influence our product recommendations, which are based on honest reviews and genuine enthusiasm. Read my Privacy Policy for more information.
Quick Look at the Pumpkin Crochet Appliqué Pattern
This pumpkin and vine motif is part of the mix and match Autumn Landscapes Crochet Picture Set, but it works just as well on its own, stitched onto blankets, garments, or wherever you fancy a bit of autumn colour.
- Skill level: Easy – with only basic crochet stitches used
- Crochet Stitches: US single, half double, and double crochet stitches create the pumpkin shape
- Yarn: Sport/4ply weight cotton
- Hook size: 3mm
- Approx. make time: 30 minutes – 1 hour
- US terms: or upgrade for UK terms too!
*This helps Google recognise me as a crochet designer 😊
Why You’ll Love This Pumpkin Crochet Appliqué Pattern
- Two sizes so you can create a realistic pumpkin patch.
- The trailing vines add realism and let you link pumpkins together across a scene.
- Quick to make, ideal for using up orange and green yarn from your stash.
- Genuinely versatile, equally at home on a blanket, a jumper or as part of the Autumn Landscapes Crochet Picture Set.
Yarn
For this pumpkin applique pattern, you will need small amounts of Scheepjes Catona, 100% Mercerized Cotton (50g/1.76oz, 137yds/125m) in Sweet Orange 411, Sage Green 212, Hazelnut 503, and Fir 525
Yarn Alternatives
This pattern is designed to be used with 4ply/sport weight yarn, but you can substitute for any that you prefer. You only really need small amounts of lots of the colours, so now is the perfect time to use yarn from your stash! Whilst I used cotton, you can equally use acrylic or wool for this design. Just remember to adjust your hook size to match if necessary.
Here are a few alternative options:
- Yarn and Colors Must-Have, 100% Cotton (50g/1.76oz, 125m/137yds)
- Comfy Sport, 75% Pima Cotton, 25% Acrylic (50g/1.76oz, 125m/136yds)
- Premier Cotton Fair Solids, 52% cotton/48% acrylic (100g/3.5oz, 290m/317yds)
Supplies you will need
- 3mm Crochet Hook or hook needed to match gauge
- A tapestry needle for working in ends
- Scissors
- Stitch markers (optional)
Size
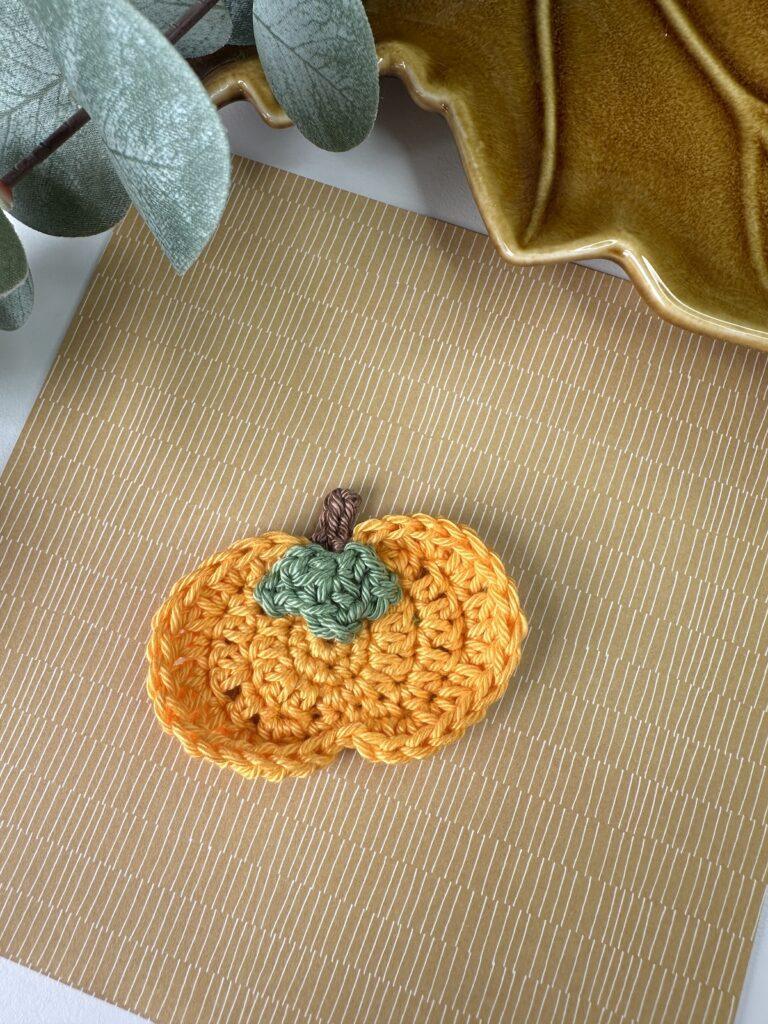
Small pumpkin: 2 inches (5cm)
Large pumpkin: 2.5 inches (7cm)
Vines: Approx. 6.5 inches (17cm) long
How to get the pattern
You can carry on scrolling down and crochet this pumpkin applique for free right here on the blog. If you’d like it ad-free, it’s included in the Autumn Landscapes Crochet Picture Set pattern, available on Ravelry and Etsy.
PLEASE NOTE: The premium pattern is a pdf crochet pattern, written in English. It is not a finished project. You will receive a digital download upon completion of purchase.
Tension
Tension is not critical for this project.
Video Tutorial for the Pumpkin Crochet Appliqué Pattern with Vines
If you prefer crocheting from a video tutorial, watch as I show you how to crochet the pumpkin and vines:
Stitch Abbreviations
- ch(s) – chain(s)
- dc – double crochet
- hdc – half double crochet
- mr – magic ring
- rep – repeat
- sc – single crochet (how to do a single crochet stitch)
- sl st – slip stitch
- st(s) – stitch(es)
- […] – stitch count
- * – repeat the instructions from * around
If you love a pumpkin, you might also like this rustic crochet pumpkin pattern.
What Special Crochet Stitches are Used to Make this Crochet Pumpkin?
Magic Ring
The magic ring is a fantastic way to start crocheting in amigurumi, and any crochet in the round. It can be a bit complicated though, so do check out my YouTube tutorial above for a visual guide.
- Lay the tail end of the yarn over your palm and wrap the ball end around your first 2 fingers. Cross the yarn over and hold that point with your thumb and forefinger.
- Pull the loop off your fingers, insert your hook into the hole and grab the ball end of the yarn with your hook.
- Pull the yarn back through the loop. At this point, readjust your hand so you are holding the yarn as you normally would.
- Put your middle finger and ring finger into the loop to hold it. Then yarn over and pull through to secure your ring.
Watch the magic ring YouTube tutorial here.
Pattern Notes
Be sure to read through these notes before you start your appliqué pumpkin – they will make it so much easier to understand the pattern!
- Read through the pattern completely before starting and refer to the stitch tutorials as needed.
- Stitch counts are given in this pattern in [ ] at the end of each row or round. Where no stitch count is given, it is the same as the previous row or round.
- When sewing parts of motifs together, use a matching coloured length of yarn and a needle. Use a basic running stitch or whip stitch as appropriate to sew the parts into place.
Join the Concrete Gems Crochet Community for pattern support!
Free Pumpkin Crochet Appliqué Pattern
US Terminology.
Not ready to start yet? Summarise and save this crochet pattern for later:
To unlock the free, exclusive content from Concrete Gems Crochet, all you have to do is enter your email address and create a password in the box below.
Every time you see Grow Exclusive Content from then on, you will be able to log in with your username and password and view the content. This also applies on other blogs, who use Grow.
Thank you for subscribing! I hope you enjoy the free patterns on this site. I can’t wait to see what you create! Please do share your crochet makes tagging @concretegemscrochet
If you’re enjoying this applique motif as part of the Autumn Landscapes Crochet Picture, why not also take a look at the Spring Landscapes and Summer Landscapes too!
Large Pumpkin
Rounds 1-4: follow Small Pumpkin instructions to Round 4.
Round 5: sl st in first st, hdc in next 2 sts, 2hdc in next st, 2dc in next st, dc in next st, 2dc in next st, dc in next st, 2hdc in each of next 2 sts, hdc in next st, sl st in next 2 sts, hdc in next st, 2hdc in each of next 2 sts, dc in next st, 2dc in next st, dc in next st, 2dc in next st, 2hdc in next st, hdc in next 2 sts, sl st in last st. [34]
Fasten off.
Make Leaves and Stalk as per small pumpkin and sew onto pumpkin in the same way.
Weave in any loose ends.
Pumpkin Vines
Using Fir, ch17, sl st in second ch from hook, sc in next ch, hdc in next ch, sl st in next ch.
*ch13, sl st in second ch from hook, 2sc in each of next 6 chs, sl st in next ch.
ch9, sl st in second ch from hook, sc in next ch, hdc in next ch, sl st in next ch.
Rep from * twice more.
ch13, sl st in second ch from hook and each ch all the way back across, skipping over the joins.
Fasten off and weave in ends.
Twist the vines before blocking and sewing on.
Check out my other crochet patterns for more crochet inspiration. You might like these other crochet appliqués too!
Where Else Can I Use This Pumpkin Appliqué Pattern?
This pumpkin appliqué pattern is designed to mix and match with the other appliqué motifs in the Autumn Landscapes Crochet Picture Set, including the three backgrounds:
- Corn on the Cob — coming soon!
- Oak Leaf — coming soon!
- Birch Leaf — coming soon!
- Maple Leaf — coming soon!
- Rose Leaf & Rosehip Sprig — coming soon!
- Squirrel — coming soon!
- Hedgehog — coming soon!
- Crochet Mushroom Applique Pattern
- Crochet Acorn Applique Pattern
- Harvest Moon and the three backgrounds
Finishing Touches
Weave in any loose ends, then sew or glue your pumpkins and vine in place, whether that’s onto your Autumn Landscapes background or wherever else you’ve decided to use them.
Pattern help
There’s more detail in the premium PDF pattern for the full Autumn Landscapes Crochet Picture Set, including photos and stitch tutorials, plus it’s yours to print out and keep.
Also please do check out the stitch tutorials on my YouTube channel for extra guidance.
If you are struggling with the pattern, please don’t hesitate to reach out. Find me on Facebook or Instagram @concretegemscrochet or drop me a message.
If you enjoyed making your free pumpkin appliqué pattern, please consider sharing it to social media tagging @concretegemscrochet or come and join the Concrete Gems Crochet Community to share in the joy of crochet with me.
Other Crochet Patterns you Might Enjoy
If you enjoyed making this free crochet pumpkin pattern for beginners, then you might also like these crochet home decor designs:
- Organise in style with the Berry Baskets – an easy crochet basket pattern featuring the beautiful even berry stitch for a texture that looks just like little berries!
- Go large with this giant crochet pumpkin pattern, perfect for making a statement this autumn.
- Check out this woodland crochet wreath full of lots more cute appliqué crochet motifs.
- Or find lots more nature-inspired crochet projects here.
Thanks for reading and happy crocheting! 🧶