Joining crochet squares together can be such a chore sometimes – you just want the project finished already! But that’s not the case with the flat slip stitch seam! It creates a decorative, textured finish that actually adds to your project instead of taking away from it. Plus it’s easy and enjoyable to work too!
In this slip stitch seam tutorial, you’ll learn how to work this beautiful join with step by step photos and a video tutorial to help too! This method is beginner-friendly and perfect for: Granny squares, blankets, garments, and any project where you want your seams to look as good as your stitches!
Disclosure: This post may contain affiliate links. This means we may receive a commission if you click a link and make a purchase. However, this does not influence our product recommendations, which are based on honest reviews and genuine enthusiasm. Read my Privacy Policy for more information.
Flat Slip Stitch Seam Crochet Tutorial Overview
- Stitch: slip stitch used to seam squares together
- Style: Decorative and fun!
- Experience Level: Advanced beginner
- Perfect For: Adding texture and a neat decorative join to modular projects
- Yarn: Paintbox Yarns Simply DK
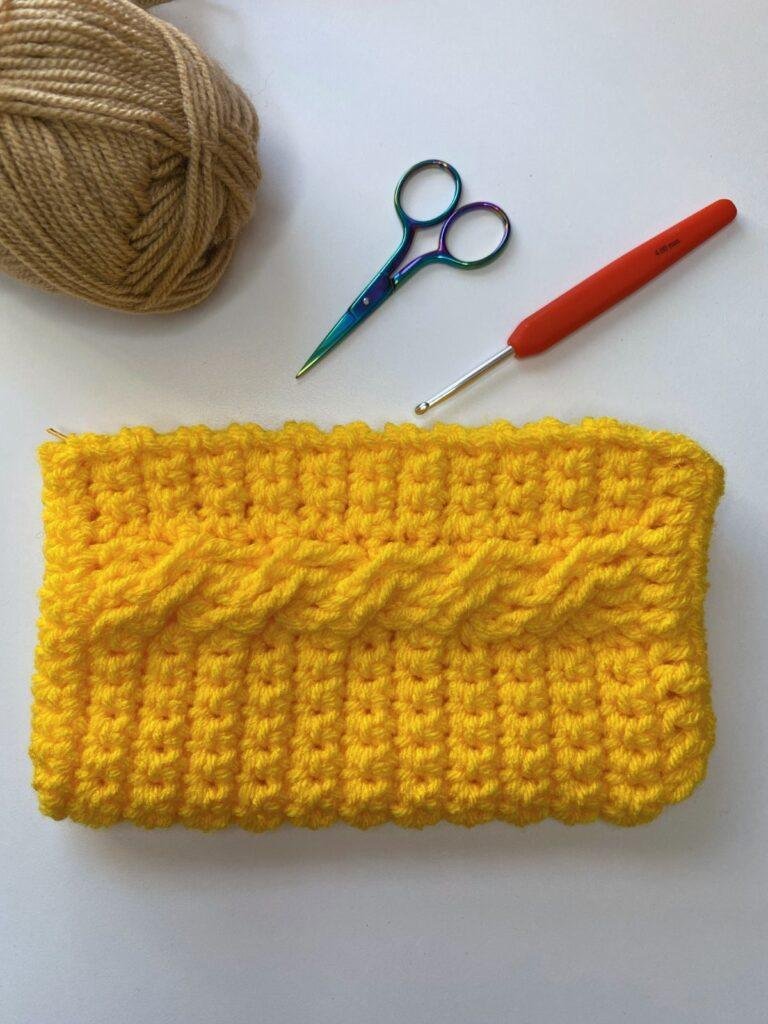
Check out the flat slip stitch seam in the Blooming Tiles Blanket pattern!
What Is the Flat Slip Stitch Seam?
The flat slip stitch seam is a crochet joining method worked through the back loops of two pieces to create a flat, neat seam on the right side. It’s commonly used for garments and projects where a visible, decorative seam is desired.
There are quite a few different types of slip stitch seam, depending on which loops you use. Check out another version of the slip stitch seam here.
When to Use a Flat Slip Stitch Seam
The flat slip stitch seam is ideal when you want a neat, flat join that sits on the right side of your work. Unlike invisible seams, this method creates a subtle decorative ridge, making it both functional and visually appealing.
Use this seam when:
- You want a flat finish
Because you’re working through the back loops only, the seam doesn’t add bulk, making it perfect for projects that need to sit comfortably against the body. - You don’t mind (or want) a visible seam
The flat slip stitch seam creates a defined line, which can be used as a design feature—especially effective in colourwork or textured pieces. However, if you use the same colour yarn, it can blend in nicely to the rest of the piece. - You’re joining garment pieces
It’s a great choice for shoulder seams, sleeves, and side seams where a flat, sturdy join is important. - You’re working with structured or medium-weight yarns
This seam holds its shape well, making it ideal for projects that benefit from a bit of structure. - You want a quick, crochet-only joining method – my favourite reason!!
No sewing or yarn needle required—just your hook and working yarn.
When Not to Use a Flat Slip Stitch Seam
While this seam is versatile, it’s not always the best choice—especially if you’re after a completely invisible or flexible finish.
Avoid using this seam when:
- You need an invisible seam
The flat slip stitch seam is visible by design, although if you use the same yarn, you can only see the texture of the stitches. For a seamless look though, a mattress stitch is usually a better option. - You want maximum stretch
This seam has very little give, so it’s not ideal for areas that need to stretch, such as cuffs, necklines, or fitted garments. - You’re working with very thick or bulky yarn
Even though it’s relatively flat, the seam can still feel too heavy or stiff with chunky yarns. - Your stitch counts don’t match perfectly
This method works best when stitches line up evenly—otherwise, the seam can pucker or pull. - You want a completely smooth surface
Because it creates a slightly raised ridge, it may not suit projects where you want a totally flush, uninterrupted fabric.
However, I think it’s suitable for the vast majority of projects! I love the texture it creates!
Summarise this post with AI
How to Crochet the Flat Slip Stitch Seam
You will need
You can try this tutorial with any yarn and a corresponding hook. I used:
- Paintbox Yarns Simply DK, 100% Acrylic, (276m/302yds, 100g/3.53oz)
- 4.0mm Crochet Hook
- Tapestry needle for working in ends
- Scissors
Watch the Crochet Slip Stitch Seam Video Tutorial
If you prefer crocheting from a video tutorial, watch as I join crochet squares together with this joining method:
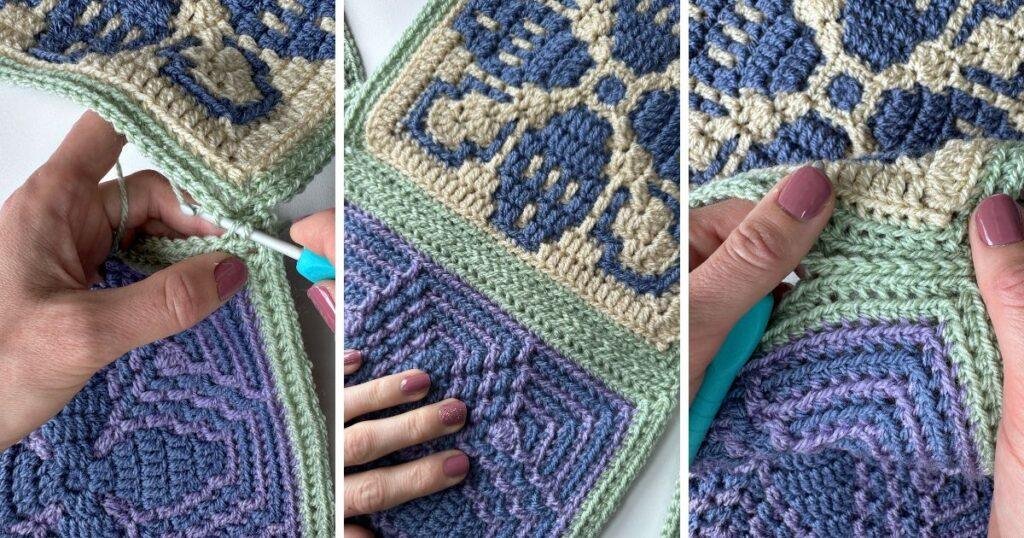
How to Join Granny Squares with a Flat Seam? – Photo Tutorial
Time needed: 30 minutes
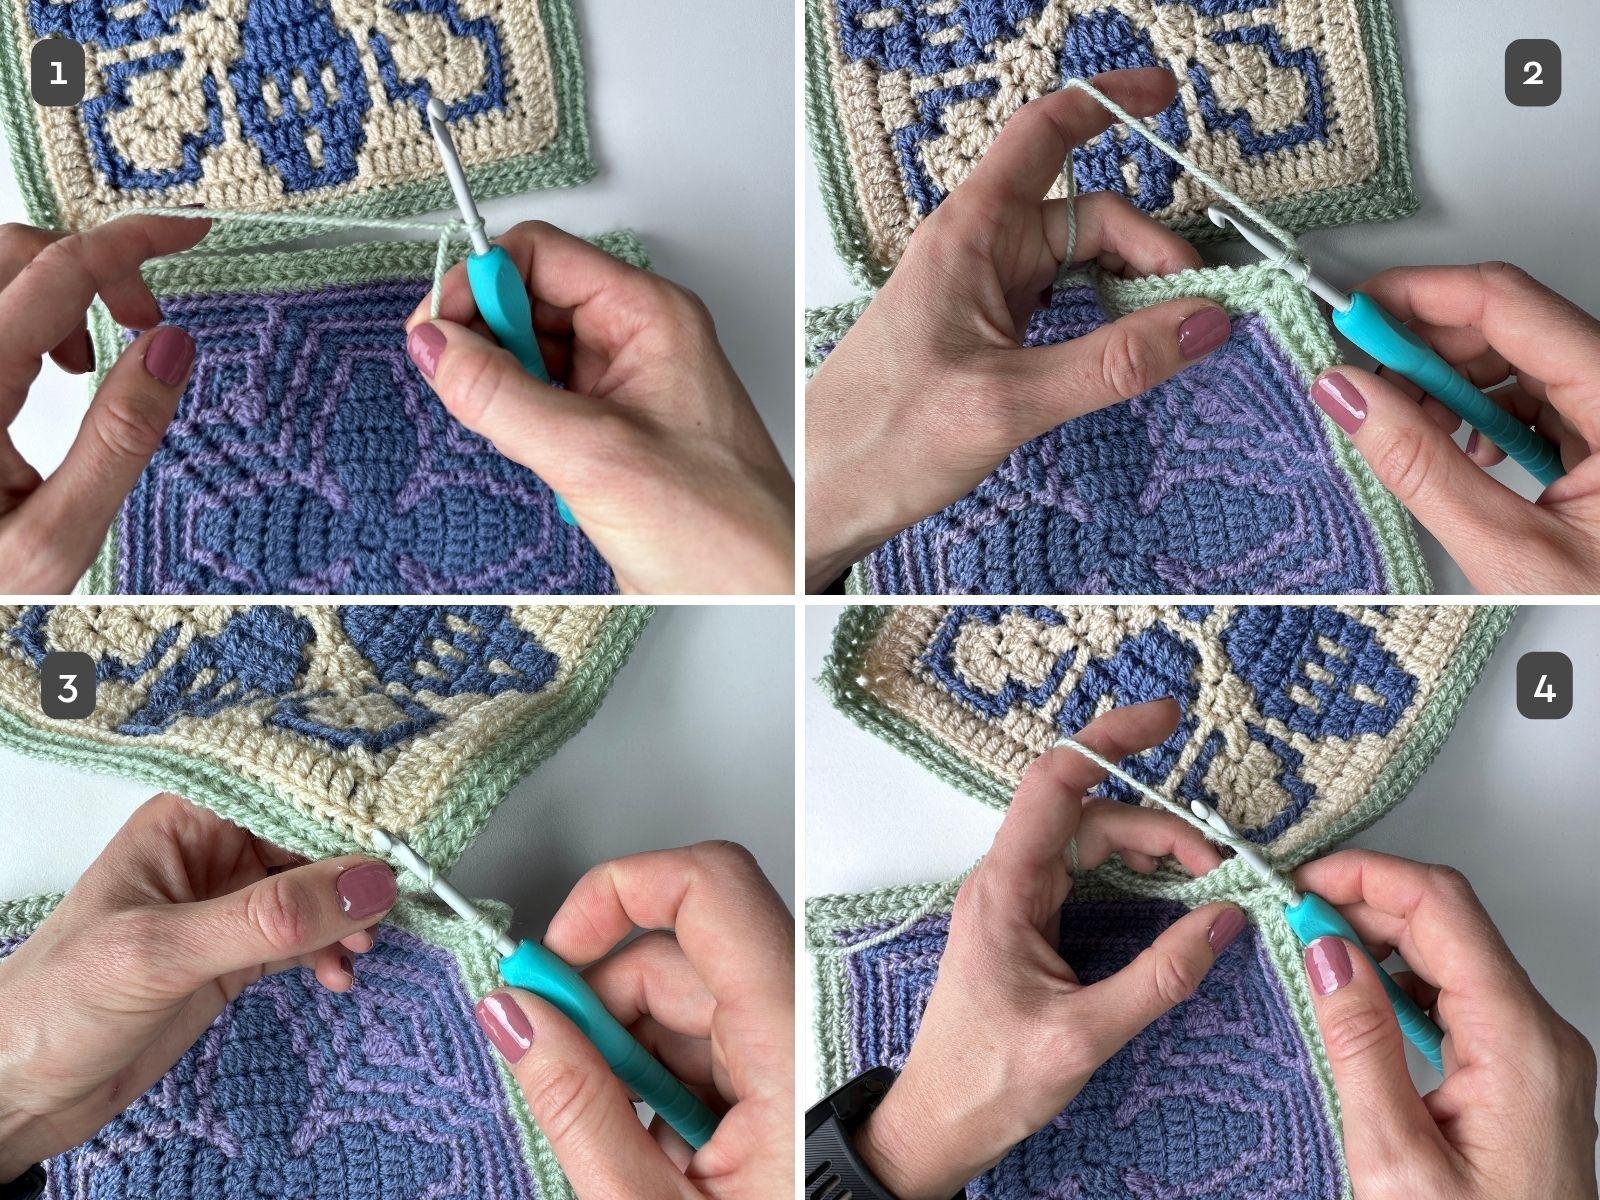
This is how you work a flat slip stitch seam:
- Start by placing a slipknot on your hook (image 1).
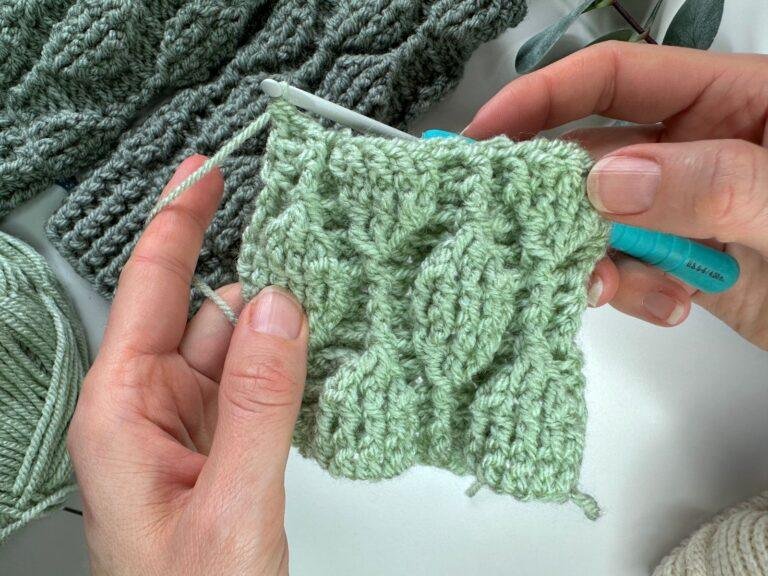
Insert your hook into the back loop of the stitch on the panel nearest you, (image 2).
Then insert your hook into the back loop of the corresponding stitch on the panel furthest from you. These are the 2 loops nearest the table or the inside loops of the 2 squares (image 3).
With the yarn held between the 2 squares and to the underneath, yarn over. (image 4).
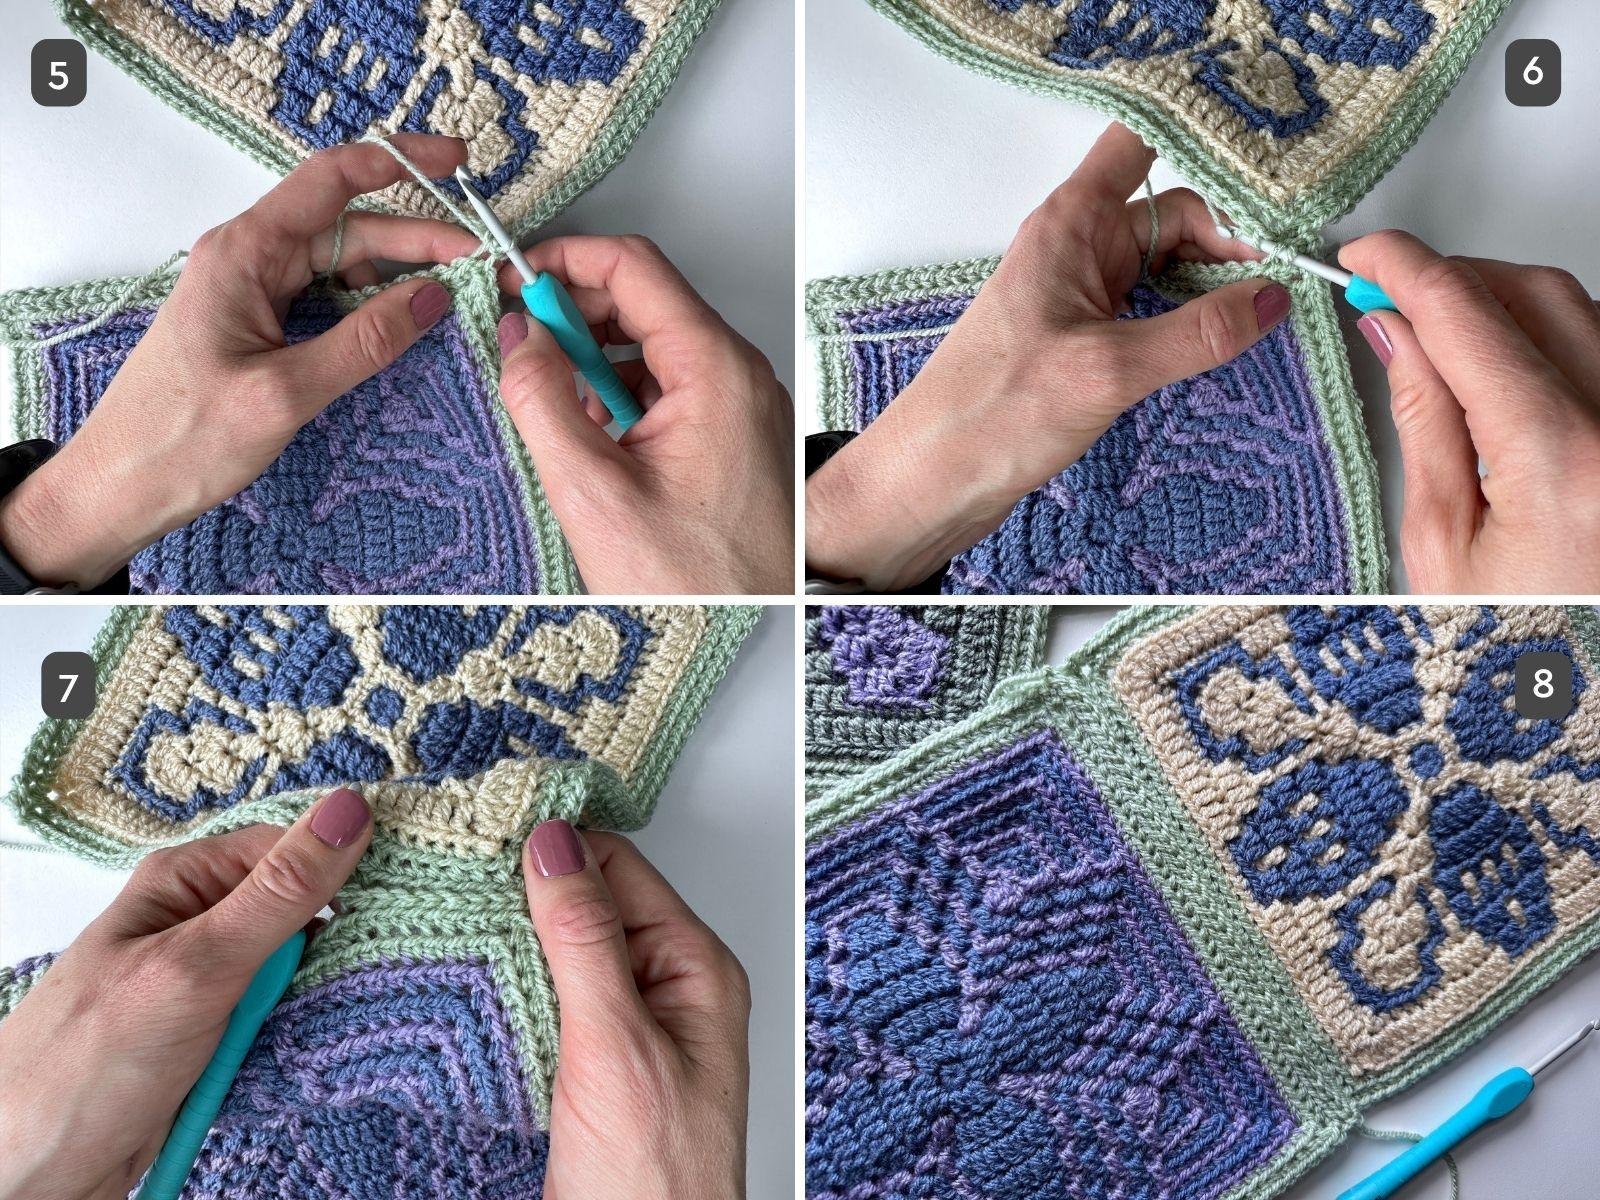
- Pull through both loops and the loop on your hook, keeping your tension fairly loose (image 5).
Continue working across your seam, keeping the yarn underneath throughout, working into the loops in the same order as before (image 6).
Images 7 & 8 show the completed seam.
Join the Concrete Gems Crochet Community for pattern support!
Common Mistakes to Avoid
Even though the flat slip stitch seam is relatively straightforward, there are a few small mistakes that you might want to look out for:
- Pulling your stitches too tight
This is the most common issue and can cause the seam to pucker or feel stiff. - Working through the wrong loops
For a flat slip stitch seam, you should be working through the back loops only of both pieces. Going through both loops creates a bulkier seam. - Not matching your stitches
If your stitch counts don’t line up, the seam can twist or gather, or you’ll end up with some stitches left over on one panel at the end. - Twisting your pieces as you join
Make sure both pieces are aligned correctly before you start seaming to avoid a distorted finish.

Troubleshooting Your Flat Slip Stitch Seam
If your seam isn’t looking quite right, here’s how to fix the most common problems:
Why is my seam puckering?
Your tension is likely too tight. Try loosening your stitches or using a larger hook for the seam.
Why doesn’t my seam lie flat?
Check that you’re working through the correct loops (back loops only). Also make sure your stitches are evenly spaced and not pulled too tight.
Why does my seam look bulky?
You may be working through both loops instead of the back loops, or using a yarn that’s too thick for this type of seam.
Why are my edges not lining up properly?
This usually comes down to mismatched stitch counts. Double-check both pieces have the same number of stitches before seaming and use stitch markers if needed.
Why does my seam feel stiff?
Flat slip stitch seams naturally have less stretch, but stiffness is often caused by tight tension. Try relaxing your grip or switching to a larger hook.
Ready to Use the Flat Slip Stitch Seam in a Project?
You can use the flat slip stitch seam in lots of my projects, even if it is not the recommended seam.
Try using it in the Dahlia Festival Bag or the Granny Plant Pot Cover to join the squares together.
Or how about using it in the Autumn Fireworks Blanket?
FAQs
Yes, it’s a great choice for garments because it creates a flat, sturdy seam that sits comfortably against the body.
Not really! It’s designed to create a decorative ridge on the right side of the project.
It has very little stretch compared to other joining methods, which makes it better for structured areas rather than stretchy edges.
Yes—if you’re comfortable with slip stitches, you can use this method. Just take care with your tension and loop placement.
You can, especially if you want a visible, decorative join. However, if you prefer a completely invisible finish, another method may be more suitable.
I hope you’ve enjoyed this tutorial, please do stick around and see what else you’d like to try on my website. You can find my other stitch tutorials here. You might like to try the moss stitch.
I’m Gemma, a crochet tech editor, designer and overall crochet enthusiast. I’m also a mum of 3 kids, and enjoy running, reading, walking and crafting, but mostly crochet!
Sign up to my mailing list for the latest news, pattern releases and special offers here
If you enjoyed learning this easy textured crochet stitch, or maybe made a project using this tutorial, please consider sharing it to social media tagging @concretegemscrochet
I have lots of crochet stitch tutorials over on my YouTube channel so please do check them out. Here are some you might like:
Other crochet patterns you might enjoy
Don’t forget to check out my crochet patterns for more crochet inspiration.
- Vintage Crochet Handbag – with textured stitches and a mosaic crochet flap.
- Trailing Leaves Crochet Hat – these use crochet post stitches to create another textured pattern.
- Christmas Wreath Crochet Pattern – quick, easy and fun with a woodland theme.
Thanks for reading and happy crocheting! 🧶