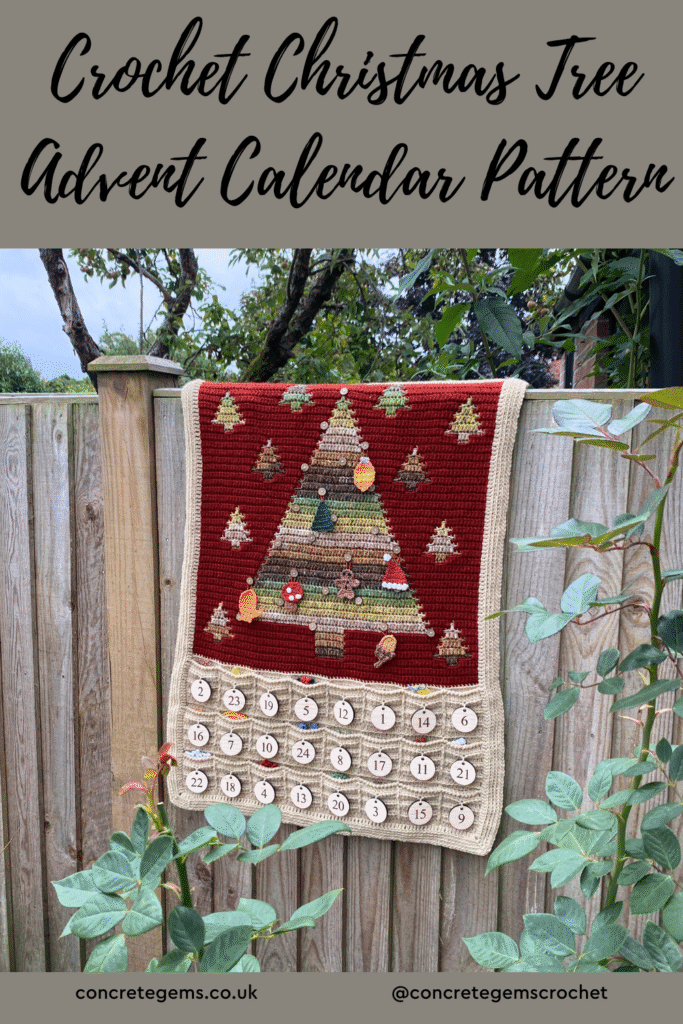
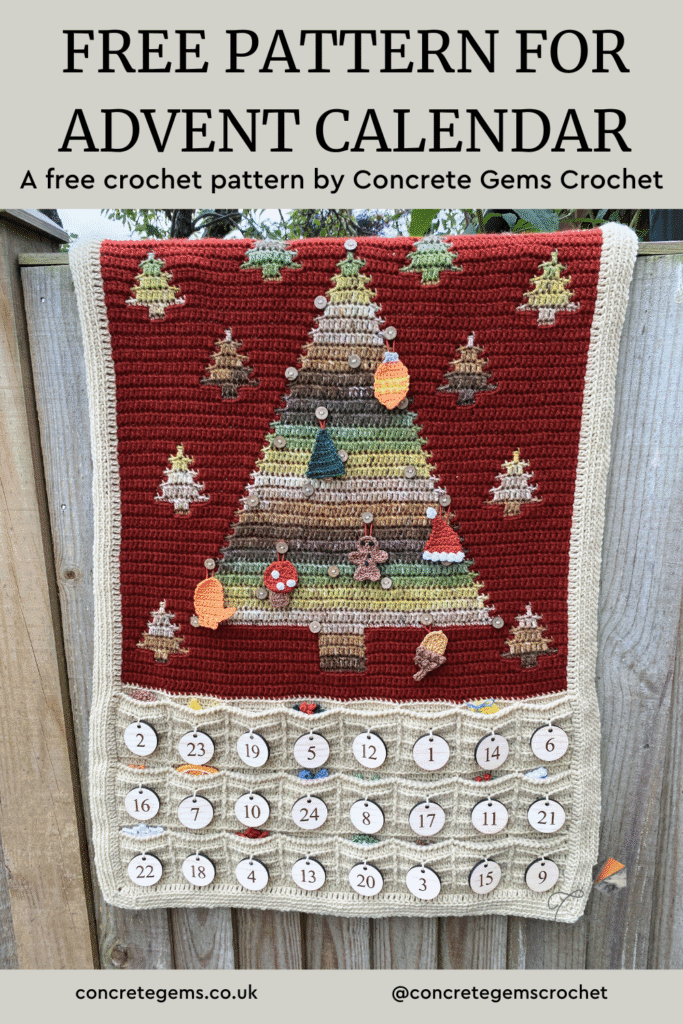
There’s something extra magical about counting down the days to Christmas, but I’ve never been a fan of the single use, chocolate advent calendars! This year I wanted to make it even more special with yarn and a hook in hand. That’s how the Woodland Advent Calendar was born – a crochet advent calendar pattern filled with nature-inspired decorations and a beautiful wall hanging.
It’s the perfect way to add handmade charm to the festive season, one stitch (and one day!) at a time.
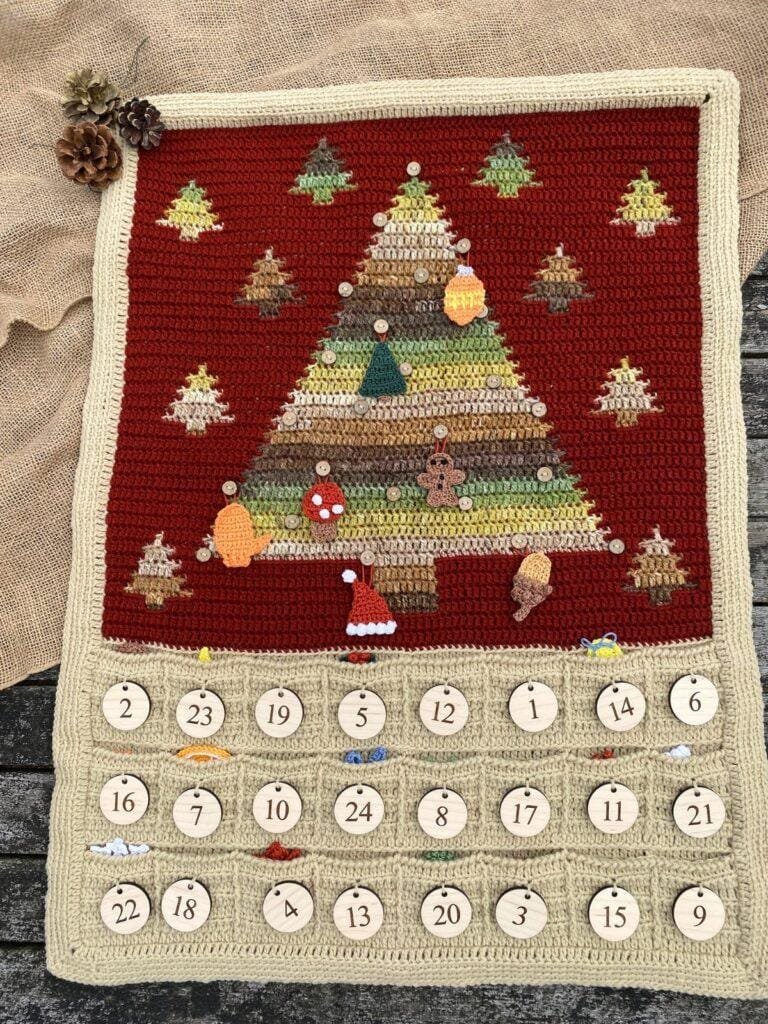
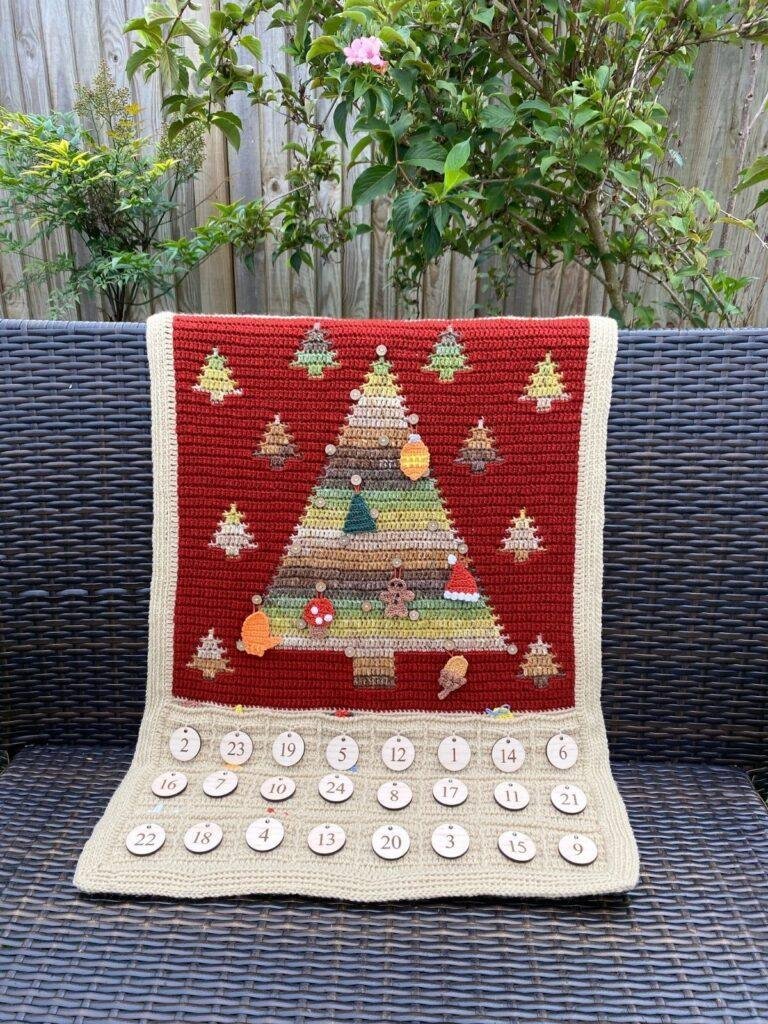
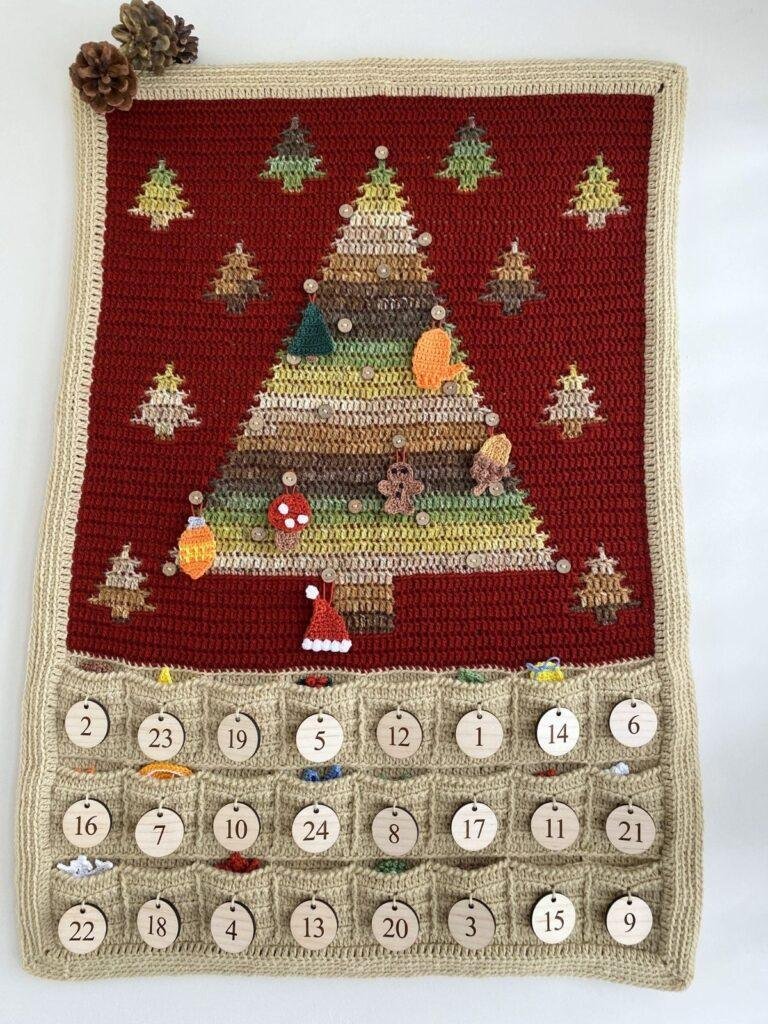
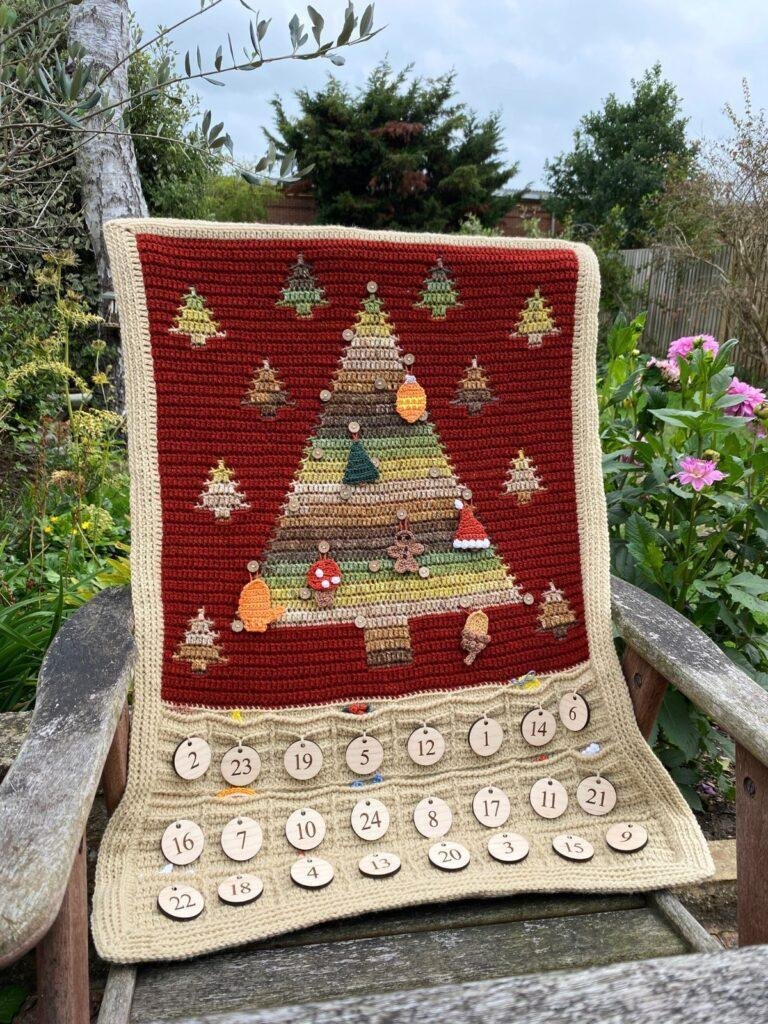
The Woodland Advent Calendar combines a cosy wall-hanging Christmas tree with 24 nature-inspired decorations, each one ready to be discovered day by day.
This pattern includes clear, step-by-step instructions to help you create your crochet christmas tree advent calendar pattern. There’s also a video tutorial to help you with any tricky bits!
Disclosure: This post may contain affiliate links. This means we may receive a commission if you click a link and make a purchase. However, this does not influence our product recommendations, which are based on honest reviews and genuine enthusiasm. Read my Privacy Policy for more information.
What’s even more exciting is that the Woodland Advent Calendar is going to be run as a crochet along!
How does the Woodland Advent Calendar Crochet Along work?
- Sign up for the waitlist today if you haven’t already: to get your supply list straight to your inbox (so you’re ready to start).
- On 13th October, the Woodland Wall Hanging pattern releases free on this blog post.
- From 1st November, a new mini decoration pattern drops daily (free on the blog: links will be posted at the bottom of this post).
- Share your progress in our friendly Facebook group and celebrate your handmade countdown to Christmas!
But if you don’t want to wait, there are options:
Choose Your CAL Experience
Free Option
✔️ Tree wall hanging pattern on the blog (13 Oct)
✔️ Daily blog posts (1–24 Nov) with step-by-step written patterns
✔️ Access to the Facebook group for support & community
💸 Cost: FREE ON THIS BLOGPOST
Premium Ebook Option
Want everything in one place, ad-free?
The Woodland Advent Ebook includes:
✔️ All 24 mini decoration patterns + the wall hanging
✔️ Printable, ad-free PDF format
✔️ Bonus stitch tips & mosaic chart
✔️ Instant access (no waiting for daily posts)
💸 Early Bird Price (from 10 Oct): £7.50
How do you make a crochet advent calendar?
The Advent Calendar is designed as a wall hanging with 24 pockets at the bottom.
We start by making the pockets, which are in 3 strips of 8 pockets each.
The back of the pockets and the mosaic Christmas Trees are then made as one piece.
After that we sew the pockets onto the wall hanging, add buttons to hang the decorations on, and add numbers to the pockets.
Finally we start making the 24 individual decorations to go in the pockets.
By 1st December we are ready to look in pocket number one and hang the decoration we find there onto the Christmas tree above!
Yarn
For the wall hanging, you will need:
King Cole Bramble DK, 100% Premium Acrylic (100g/3.53oz, 317yds/290m), in Greengage x 1 ball (C)
King Cole Big Value DK, 100% Premium Acrylic (50g/1.76oz, 158yds/145m), in Brick x 2 balls (B) and Sand x 5 balls (A)
For the 24 individual decorations, you will need:
Scheepjes Catona, 100% Mercerized Cotton, (50g/1.76oz, 137yds/125m):
1 ball each of the following:
D: Snow white (106), E: Peach (386), F: Bluebird (247), G: Mercury (074), H: Hazelnut (503), I: Topaz (179), J: Sweet Orange (411), K: Jet Black (110), L: Lemon (280), M: Fir (525), N: Rust (388), O: Sage Green (212).
Yarn Alternatives
This pattern is designed to be used with a DK weight acrylic for the wall hanging and sport/fine weight cotton for the hanging decorations. However, you can use whatever yarn you would like, being sure to stick to the same yarn weights that I used. The decorations in particular would be great made using yarn from your stash.
Here are a few alternative options you might like:
Wall Hanging:
Brava Recycle, 100% Recycled Acrylic (100g/3.5oz, 280m/306yds)
Lion Brand Coboo, 50% Cotton, 50% Rayon from bamboo (100g/3.5oz, 212m/232yds)
Stylecraft Special DK, 100% Acrylic (100g/3.5oz, 295m/323yds)
Premier Colorfusion DK, 100% Acrylic (100g/3.5oz, 297m/325yds)
Decorations:
Yarn and Colors Must-Have, 100% Cotton (50g/1.76oz, 125m/137yds)
Comfy Sport, 75% Pima Cotton, 25% Acrylic (50g/1.76oz, 125m/136yds)
Premier Cotton Fair Solids, 52% cotton/48% acrylic (100g/3.5oz, 290m/317yds)
Supplies you will need
2.5mm (for the decorations) and 4.0mm (for the wall hanging part) Crochet Hook or hook to meet gauge for wallhanging
A tapestry needle for working in ends
Small Wooden Numbers (1 to 24)
24 Natural Buttons 0.5 inch (12mm)
Dowel or branch for hanging approx. 22 inches (56cm) long
Sizing
22 inches wide x 31 inches tall (56cm x 79cm)
How to get the pattern
There are a few different ways that you can get your crochet advent calendar pattern.
You can carry on scrolling down and read the pattern for free on the blog in US crochet terms. The blog has ads on it, which is how I am able to offer it for free. Please do bookmark the page and come back to it as you work on your pattern though, rather than trying to print it out. Spending time on this page is how I get paid. You will then need to move about the different blog posts for the 24 hanging decorations.
Alternatively you can purchase a premium pdf version of the pattern, which includes mosaic crochet charts, stitch tutorials, links to lots of video tutorials and full explanations. The premium pattern comes in US and UK terms. And of course, if you purchase the pattern, it is yours to keep, print and make notes on too.
PLEASE NOTE: The premium pattern is a pdf crochet pattern, written in English. It is not a finished project. You will receive a digital download upon completion of purchase.
Included in the ad-free premium pattern:
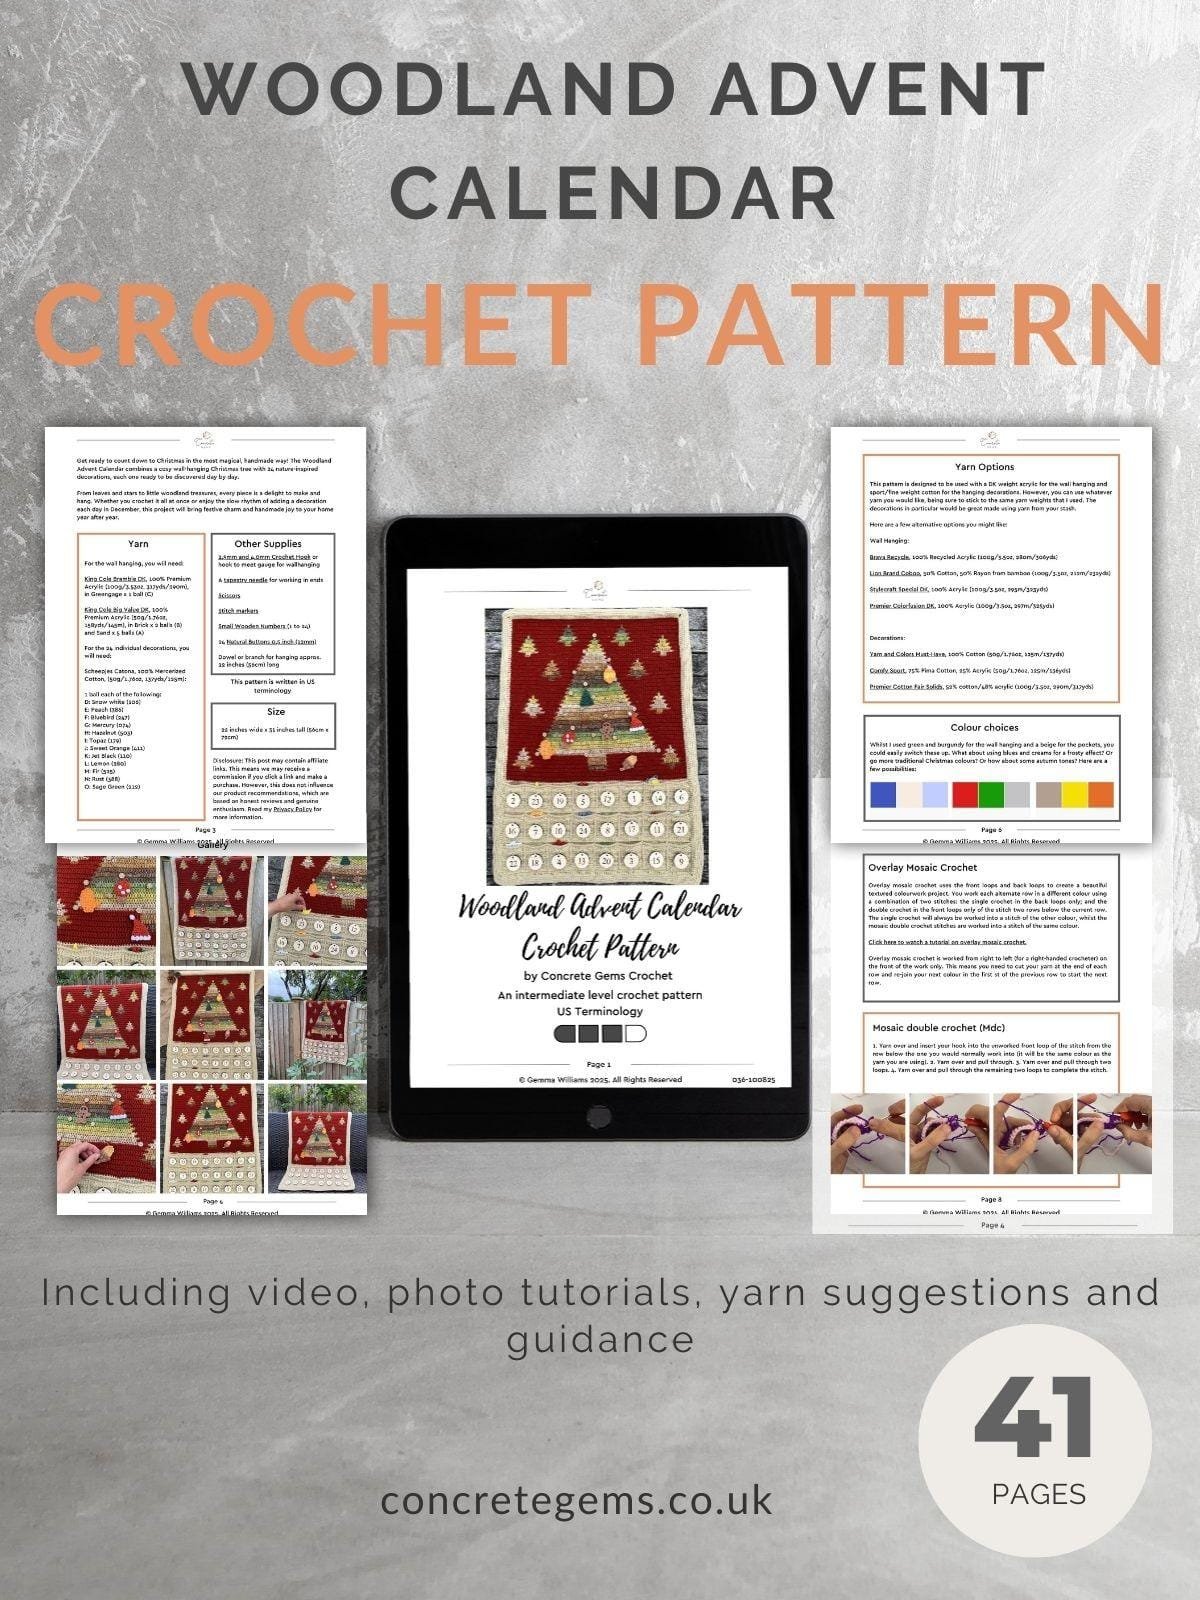
- A 41 page downloadable and printable PDF with easy-to-follow instructions in US and UK crochet terms
- Yarn recommendations
- Pattern support if needed
- An accompanying video tutorial
- All 24 mini decoration patterns + the wall hanging in one place
- Bonus stitch tips & mosaic chart
- Instant access (no waiting for daily posts)
Difficulty level is Intermediate.
Tension:
18 sts and 16 rows over mosaic crochet and over exhdc using the 4mm hook = 4 x 4 inches (10 x 10 cm)
To measure your tension, create 1 sample swatch in exhdc and 1 using mosaic crochet.
If your sample swatch is bigger than the tension given, try with a smaller hook size. If your swatch is smaller than the tension given, try with a larger hook size.
Abbreviations
A, B, C etc. – yarn colours
blo – back loops only
bob – bobble stitch
BPdc – back post double crochet
BPdc/exhdctog – back post double crochet & extended half double crochet together
ch-sp – chain space
dc – double crochet
exhdc – extended half double crochet
flo – front loops only
FPdc – front post double crochet
FPdc/exhdctog – front post double crochet & extended half double crochet together
hdc – half double crochet
Mdc – mosaic double crochet
MR – magic ring
picot – ch3, ss in third ch from hook
rep – repeat
RS – right side
sc – single crochet
sc2tog – single crochet 2 together
sk – skip
ss – slip stitch
st(s) – stitch(es)
tr – treble
tr4tog – treble stitch 4 together
WS – wrong side
[…] – stitch count
* – repeat the instructions from * around
Special Stitches
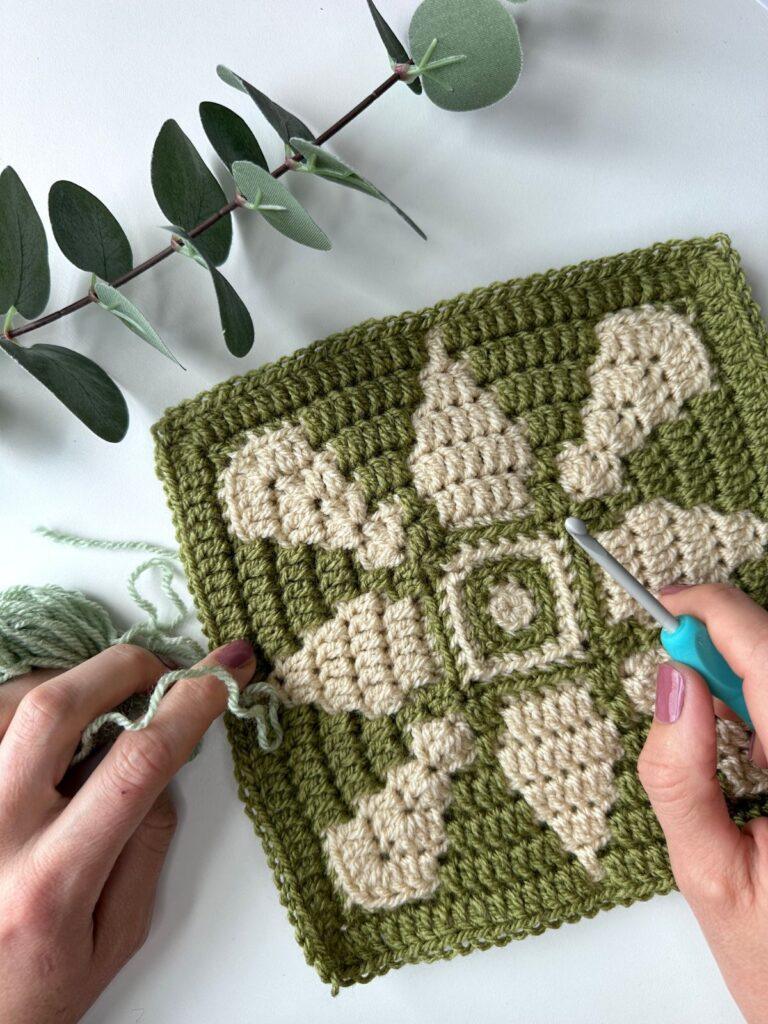
Overlay Mosaic Crochet
Overlay mosaic crochet uses the front loops and back loops to create a beautiful textured colourwork project. You work each alternate row in a different colour using a combination of two stitches: the single crochet in the back loops only; and the double crochet in the front loops only of the stitch two rows below the current row. The single crochet will always be worked into a stitch of the other colour, whilst the mosaic double crochet stitches are worked into a stitch of the same colour.
Click here to watch a tutorial on overlay mosaic crochet.
Overlay mosaic crochet is worked from right to left (for a right-handed crocheter) on the front of the work only. This means you need to cut your yarn at the end of each row and re-join your next colour in the first st of the previous row to start the next row.
Mosaic double crochet (Mdc)
- Yarn over and insert your hook into the unworked front loop of the stitch from the row below the one you would normally work into (it will be the same colour as the yarn you are using).
- Yarn over and pull through.
- Yarn over and pull through two loops.
- Yarn over and pull through the remaining two loops to complete the stitch.
Extended half double crochet (exhdc)
Halfway between a half double crochet and a double crochet, this stitch has lots of lovely texture:
- Yarn over and insert your hook into the stitch.
- Yarn over and pull through a loop. [3 loops on the hook]
- Yarn over and pull through 1 loop. [still 3 loops on the hook]
- Yarn over and pull through all 3 loops on the hook to complete your exhdc stitch.
Watch a video tutorial of the extended half double crochet.
Surface Slip Stitch & the Envelope Border
The surface slip stitch will create a border line, which we will then use to crochet into for the envelope border.
Starting with the RS facing, insert your hook through any edge st on the top of your blanket, pull up a loop and pull through. Insert your hook into the next st, pull through a loop and continue pulling this through the loop already on your hook. This is exactly the same as a normal ss, but you are working through to the back of your work and your yarn will always be held at the back. Make sure not to pull these sts tight at all: it might help to go up a hook size for this
Now we have a line to crochet into for the envelope border. Work a dc into each loop of the surface ss along the back of your blanket, following the pattern for instructions at the corners. Work a second round of dc before fastening off. Repeat this on the front of your blanket, working 2 rounds of dc into the 2 loops of the surface ss, again paying attention to instructions in the pattern.
To close the envelope border, ss the 2 sides of the border together, making sure not to pull it too tight.
Watch a YouTube tutorial of the surface slip stitch here
Stacked double crochet
The stacked dc is a lovely alternative to a turning chain. It creates a cleaner, straighter edge for your crochet projects without gaps or uneven edges. To create a stacked treble, simply stack another single crochet on top.
- Insert your hook straight into the very first st of the row/round without chaining first.
- Yarn over and pull through, then yarn over and pull through 2 (completing a single crochet).
- Insert your hook now into the vertical bar of the single crochet st that is furthest from your hook side.
- Yarn over and pull through, then yarn over and pull through 2 (completing a stacked double crochet).
- Watch a YouTube tutorial here
Crab stitch (or reverse sc)
The crab stitch, also known as reverse single crochet, is a simple yet effective edging stitch that creates a beautifully textured, rope-like finish
- Insert hook into the previous st.
- Yarn over and pull through, making sure to pull the loop up fully.
- Yarn over and pull through the remaining 2 loops on your hook.
- Continue repeating steps 1-3 working backwards around your work.
BPdc/exhdctog
Yo, insert hook around post of next st from back to front to back, yo and pull through, yo, pull through 2, yo, insert hook into normal loops of same st, yo and pull through, yo, pull through 1, yo and pull through all 4 loops on your hook.
FPdc/exhdctog – made in the same way but going around the post from front to back to front again.
Pattern Notes
Be sure to read through these notes before you start your crochet Christmas advent calendar – they will make it so much easier to understand the pattern!
- Read through the pattern completely before starting and refer to the stitch tutorials as needed.
- Be sure to check your gauge for the mosaic section and the exhdc section and adjust your hook sizes accordingly.
- Stitch counts are given in this pattern in [ ] at the end of each row or round. Where no stitch count is given, it is the same as the previous row or round.
- Starting ch3 counts as an exhdc.
- Stacked dc counts as an exhdc.
- Starting ch1 and ch2 does not count as a st.
- Make the pockets and wall hanging with the 4mm hook (or hook needed to meet gauge) and the 2.5mm for the hanging decorations.
- In the mosaic section, you will start each Row joining your yarn with a ch1 and a single crochet through both loops of the first st of the previous row. The last stitch of the Row is also a single crochet through both loops. At the end of each Row, cut your yarn leaving around 10cm / 4″ to be enclosed in the envelope border at the end.
- There is a stitch chart of the mosaic section in the ad-free pdf version of the pattern.
- In some of the decorations, you will be required to turn and work back down the other side of the chain. To do this, rotate your work 180 degrees around and work into the other loop of the chain opposite to where you already worked.
- In others, we work in continuous spirals, which means a round ends without joining and you simply move straight onto the first st of the next round.
Pin this crochet advent calendar pattern free to your crochet Pinterest board for later
Prefer a Video Tutorial?
If you prefer crocheting from a video tutorial, hop on over to my YouTube channel and watch as I show you how to crochet the wallhanging part of the crochet advent calendar or check out the video below:
Free Crochet Advent Calendar Pattern
US Terminology.
To unlock the free, exclusive content from Concrete Gems Crochet, all you have to do is enter your email address and create a password in the box below.
Every time you see Grow Exclusive Content from then on, you will be able to log in with your username and password and view the content. This also applies on other blogs, who use Grow.
Thank you for subscribing! I hope you enjoy the free patterns on this site. I can’t wait to see what you create! Please do share your crochet makes tagging @concretegemscrochet
How about making another Christmas design? This free crochet bauble pattern features a stunning mosaic crochet snowflake motif.
Whether you’re dressing up your Christmas tree, creating unique gifts, or adding a cosy handmade vibe to your festive décor, your baubles are sure to shine in every holiday setting.
Row 30: using yarn C, ch1, sc in first st, 22sc in blo, 43Mdc, 22sc in blo, sc in last st.
Row 31: using yarn B, ch1, sc in first st, 21Mdc, 45sc in blo, 21Mdc, sc in last st.
Row 32: using yarn C, ch1, sc in first st, 23sc in blo, 41Mdc, 23sc in blo, sc in last st.
Row 33: using yarn B, ch1, sc in first st, 10Mdc, 3sc in blo, 9Mdc, 43sc in blo, 9Mdc, 3sc in blo, 10Mdc, sc in last st.
Row 34: using yarn C, ch1, sc in first st, 10sc in blo, 3Mdc, 11sc in blo, 39Mdc, 11sc in blo, 3Mdc, 10sc in blo, sc in last st.
Row 35: using yarn B, ch1, sc in first st, 6Mdc, 11sc in blo, 6Mdc, 41sc in blo, 6Mdc, 11sc in blo, 6Mdc, sc in last st.
Row 36: using yarn C, ch1, sc in first st, 8sc in blo, 7Mdc, 10sc in blo, 37Mdc, 10sc in blo, 7Mdc, 8sc in blo, sc in last st.
Row 37: using yarn B, ch1, sc in first st, 7Mdc, 9sc in blo, 8Mdc, 39sc in blo, 8Mdc, 9sc in blo, 7Mdc, sc in last st.
Row 38: using yarn C, ch1, sc in first st, 9sc in blo, 5Mdc, 12sc in blo, 35Mdc, 12sc in blo, 5Mdc, 9sc in blo, sc in last st.
Row 39: using yarn B, ch1, sc in first st, 8Mdc, 7sc in blo, 10Mdc, 37sc in blo, 10Mdc, 7sc in blo, 8Mdc, sc in last st.
Row 40: using yarn C, ch1, sc in first st, 10sc in blo, 3Mdc, 14sc in blo, 33Mdc, 14sc in blo, 3Mdc, 10sc in blo, sc in last st.
Row 41: using yarn B, ch1, sc in first st, 9Mdc, 5sc in blo, 12Mdc, 35sc in blo, 12Mdc, 5sc in blo, 9Mdc, sc in last st.
Row 42: using yarn C, ch1, sc in first st, 11sc in blo, Mdc, 16sc in blo, 31Mdc, 16sc in blo, Mdc, 11sc in blo, sc in last st.
Row 43: using yarn B, ch1, sc in first st, 11Mdc, sc in blo, 15Mdc, 33sc in blo, 15Mdc, sc in blo, 11Mdc, sc in last st.
Row 44: using yarn C, ch1, sc in first st, 29sc in blo, 29Mdc, 29sc in blo, sc in last st.
Row 45: using yarn B, ch1, sc in first st, 28Mdc, 31sc in blo, 28Mdc, sc in last st.
Row 46: using yarn C, ch1, sc in first st, 30sc in blo, 27Mdc, 30sc in blo, sc in last st.
Row 47: using yarn B, ch1, sc in first st, 29Mdc, 29sc in blo, 29Mdc, sc in last st.
Row 48: using yarn C, ch1, sc in first st, 31sc in blo, 25Mdc, 31sc in blo, sc in last st.
Row 49: using yarn B, ch1, sc in first st, 30Mdc, 27sc in blo, 30Mdc, sc in last st.
Row 50: using yarn C, ch1, sc in first st, 32sc in blo, 23Mdc, 32sc in blo, sc in last st.
Row 51: using yarn B, ch1, sc in first st, 20Mdc, 3sc in blo, 8Mdc, 25sc in blo, 8Mdc, 3sc in blo, 20Mdc, sc in last st.
Row 52: using yarn C, ch1, sc in first st, 20sc in blo, 3Mdc, 10sc in blo, 21Mdc, 10sc in blo, 3Mdc, 20sc in blo, sc in last st.
Row 53: using yarn B, ch1, sc in first st, 16Mdc, 11sc in blo, 5Mdc, 23sc in blo, 5Mdc, 11sc in blo, 16Mdc, sc in last st.
Row 54: using yarn C, ch1, sc in first st, 18sc in blo, 7Mdc, 9sc in blo, 19Mdc, 9sc in blo, 7Mdc, 18sc in blo, sc in last st.
Row 55: using yarn B, ch1, sc in first st, 17Mdc, 9sc in blo, 7Mdc, 21sc in blo, 7Mdc, 9sc in blo, 17Mdc, sc in last st.
Row 56: using yarn C, ch1, sc in first st, 19sc in blo, 5Mdc, 11sc in blo, 17Mdc, 11sc in blo, 5Mdc, 19sc in blo, sc in last st.
Row 57: using yarn B, ch1, sc in first st, 18Mdc, 7sc in blo, 9Mdc, 19sc in blo, 9Mdc, 7sc in blo, 18Mdc, sc in last st.
Row 58: using yarn C, ch1, sc in first st, 20sc in blo, 3Mdc, 13sc in blo, 15Mdc, 13sc in blo, 3Mdc, 20sc in blo, sc in last st.
Row 59: using yarn B, ch1, sc in first st, 19Mdc, 5sc in blo, 11Mdc, 17sc in blo, 11Mdc, 5sc in blo, 19Mdc, sc in last st.
Row 60: using yarn C, ch1, sc in first st, 21sc in blo, Mdc, 15sc in blo, 13Mdc, 15sc in blo, Mdc, 21sc in blo, sc in last st.
Row 61: using yarn B, ch1, sc in first st, 21Mdc, sc in blo, 14Mdc, 15sc in blo, 14Mdc, sc in blo, 21Mdc, sc in last st.
Row 62: using yarn C, ch1, sc in first st, 38sc in blo, 11Mdc, 38sc in blo, sc in last st.
Row 63: using yarn B, ch1, sc in first st, 7Mdc, 3sc in blo, 27Mdc, 13sc in blo, 27Mdc, 3sc in blo, 7Mdc, sc in last st.
Row 64: using yarn C, ch1, sc in first st, 7sc in blo, 3Mdc, 29sc in blo, 9Mdc, 29sc in blo, 3Mdc, 7sc in blo, sc in last st.
Row 65: using yarn B, ch1, sc in first st, 3Mdc, 11sc in blo, 24Mdc, 11sc in blo, 24Mdc, 11sc in blo, 3Mdc, sc in last st.
Row 66: using yarn C, ch1, sc in first st, 5sc in blo, 7Mdc, 28sc in blo, 7Mdc, 28sc in blo, 7Mdc, 5sc in blo, sc in last st.
Row 67: using yarn B, ch1, sc in first st, 4Mdc, 9sc in blo, 26Mdc, 9sc in blo, 26Mdc, 9sc in blo, 4Mdc, sc in last st.
Row 68: using yarn C, ch1, sc in first st, 6sc in blo, 5Mdc, 30sc in blo, 5Mdc, 30sc in blo, 5Mdc, 6sc in blo, sc in last st.
Row 69: using yarn B, ch1, sc in first st, 5Mdc, 7sc in blo, 16Mdc, 3sc in blo, 9Mdc, 7sc in blo, 9Mdc, 3sc in blo, 16Mdc, 7sc in blo, 5Mdc, sc in last st.
Row 70: using yarn C, ch1, sc in first st, 7sc in blo, 3Mdc, 18sc in blo, 3Mdc, 11sc in blo, 3Mdc, 11sc in blo, 3Mdc, 18sc in blo, 3Mdc, 7sc in blo, sc in last st.
Row 71: using yarn B, ch1, sc in first st, 6Mdc, 5sc in blo, 13Mdc, 11sc in blo, 6Mdc, 5sc in blo, 6Mdc, 11sc in blo, 13Mdc, 5sc in blo, 6Mdc, sc in last st.
Row 72: using yarn C, ch1, sc in first st, 8sc in blo, Mdc, 17sc in blo, 7Mdc, 10sc in blo, Mdc, 10sc in blo, 7Mdc, 17sc in blo, Mdc, 8sc in blo, sc in last st.
Row 73: using yarn B, ch1, sc in first st, 8Mdc, sc in blo, 16Mdc, 9sc in blo, 9Mdc, sc in blo, 9Mdc, 9sc in blo, 16Mdc, sc in blo, 8Mdc, sc in last st.
Row 74: using yarn C, ch1, sc in first st, 27sc in blo, 5Mdc, 23sc in blo, 5Mdc, 27sc in blo, sc in last st.
Row 75: using yarn B, ch1, sc in first st, 26Mdc, 7sc in blo, 21Mdc, 7sc in blo, 26Mdc, sc in last st.
Row 76: using yarn C, ch1, sc in first st, 28sc in blo, 3Mdc, 25sc in blo, 3Mdc, 28sc in blo, sc in last st.
Row 77: using yarn B, ch1, sc in first st, 27Mdc, 5sc in blo, 23Mdc, 5sc in blo, 27Mdc, sc in last st.
Row 78: using yarn C, ch1, sc in first st, 29sc in blo, Mdc, 27sc in blo, Mdc, 29sc in blo, sc in last st.
Row 79: using yarn B, ch1, sc in first st, 29Mdc, sc in blo, 27Mdc, sc in blo, 29Mdc, sc in last st.
Row 80: using yarn C, ch1, sc in first st, sc in blo across to last st, sc in last st.
Row 81: using yarn B, ch1, sc in first st, Mdc across to last st, sc in last st.
Fasten off. Block to measurements. The wall hanging will measure 20 inches wide x 29 inches tall (51cm x 74cm).
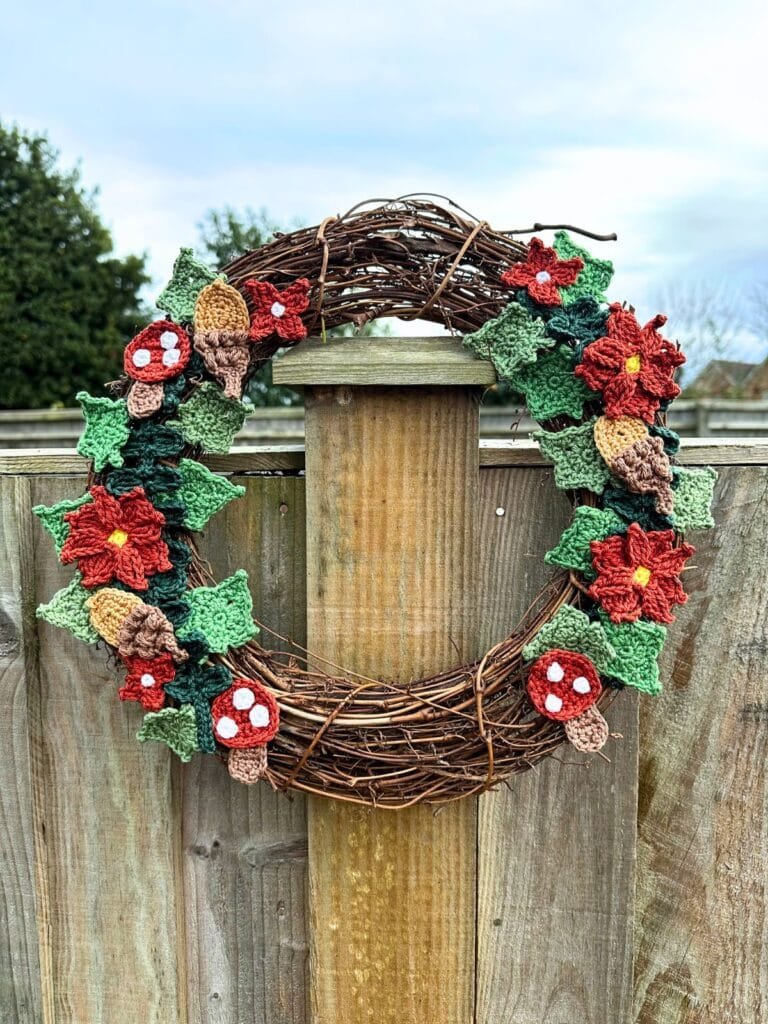
If you’re loving this pattern, you should also take a look at this Christmas wreath crochet pattern! Using some of the same motifs from the advent calendar, and the same yarn, this is a great pattern to work on with your leftover stash!
Plus, it’s a stunning decoration for your festive door!
Finishings
Tie your ends together in pairs on each side of your wall hanging to secure using a simple knot, and then cut them short (around 1”/2.5cm).
Line up your pocket strips on the bottom of the wall hanging and pin in place. Each strip should cover 8 rows. Using yarn A, sew each strip to the wall hanging along the bottom edge, going through both layers. Then sew up the sides and along each dividing line (made with post stitches). Make your stitches small and neat, so that they won’t be noticeable.
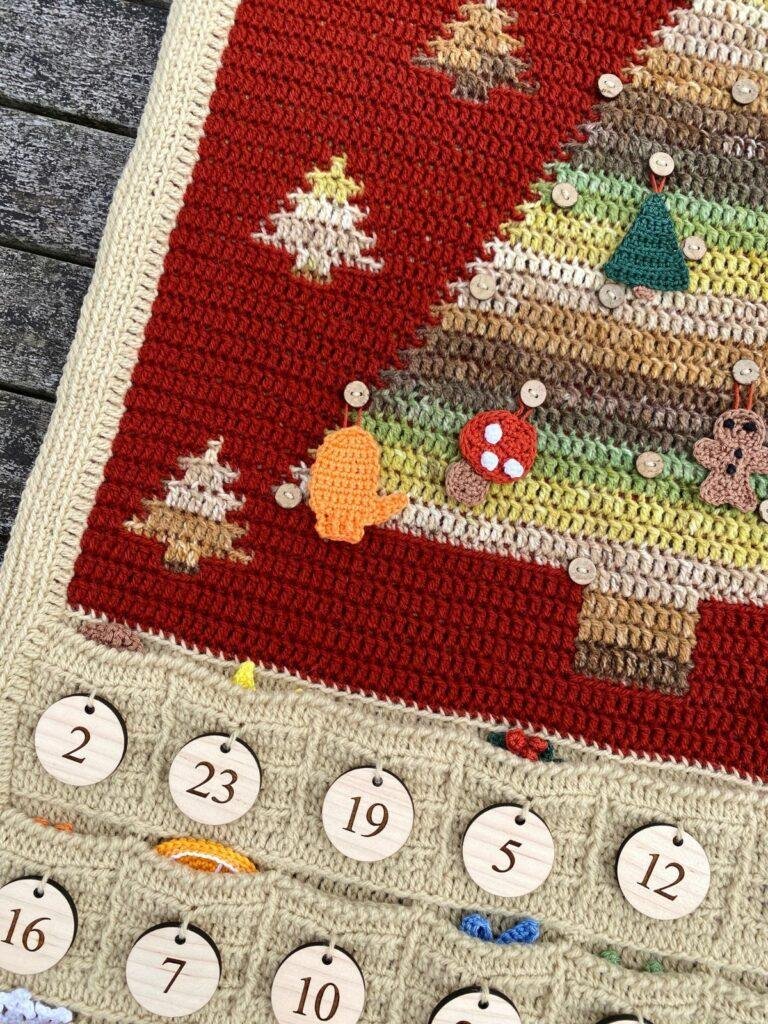
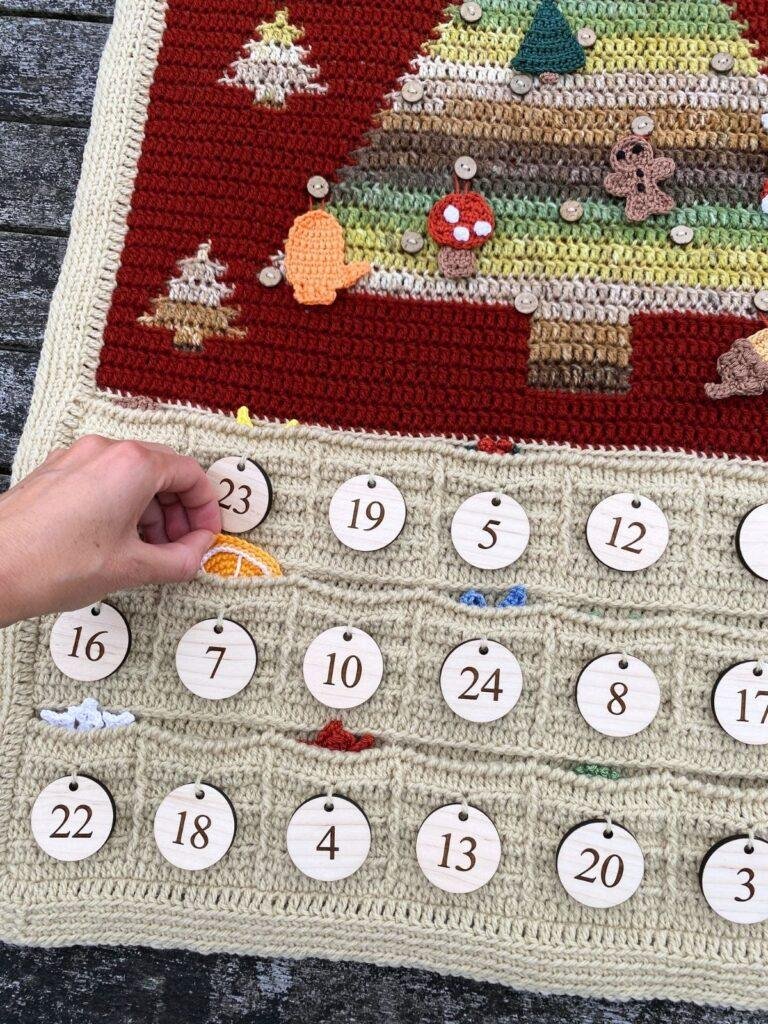
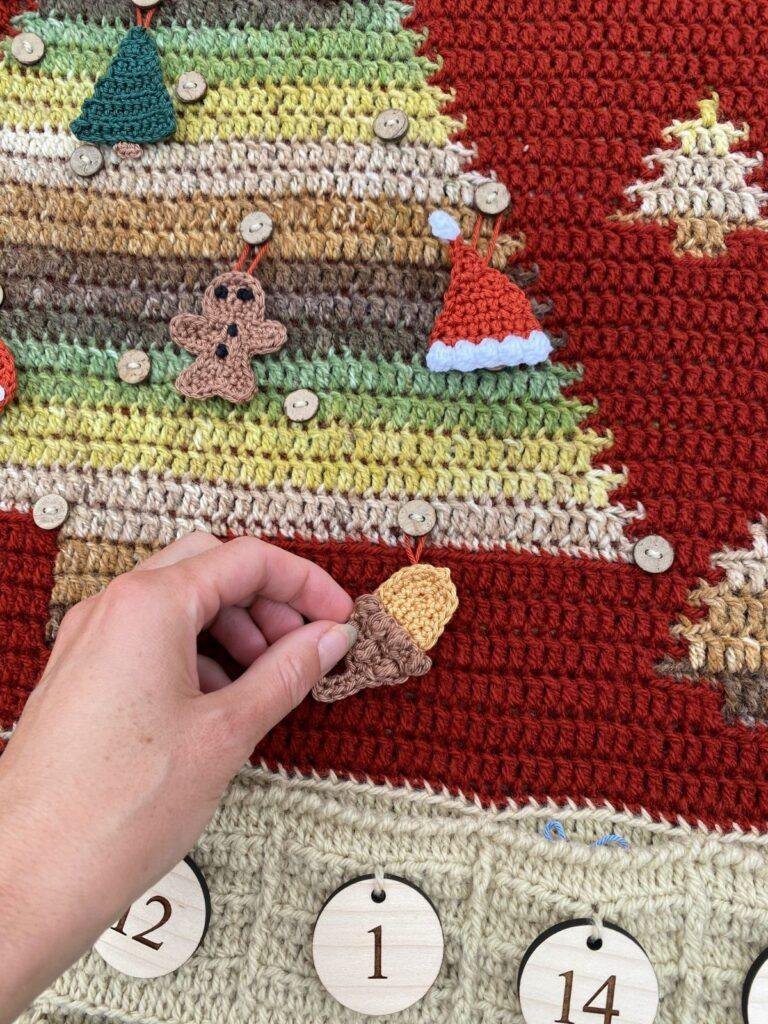
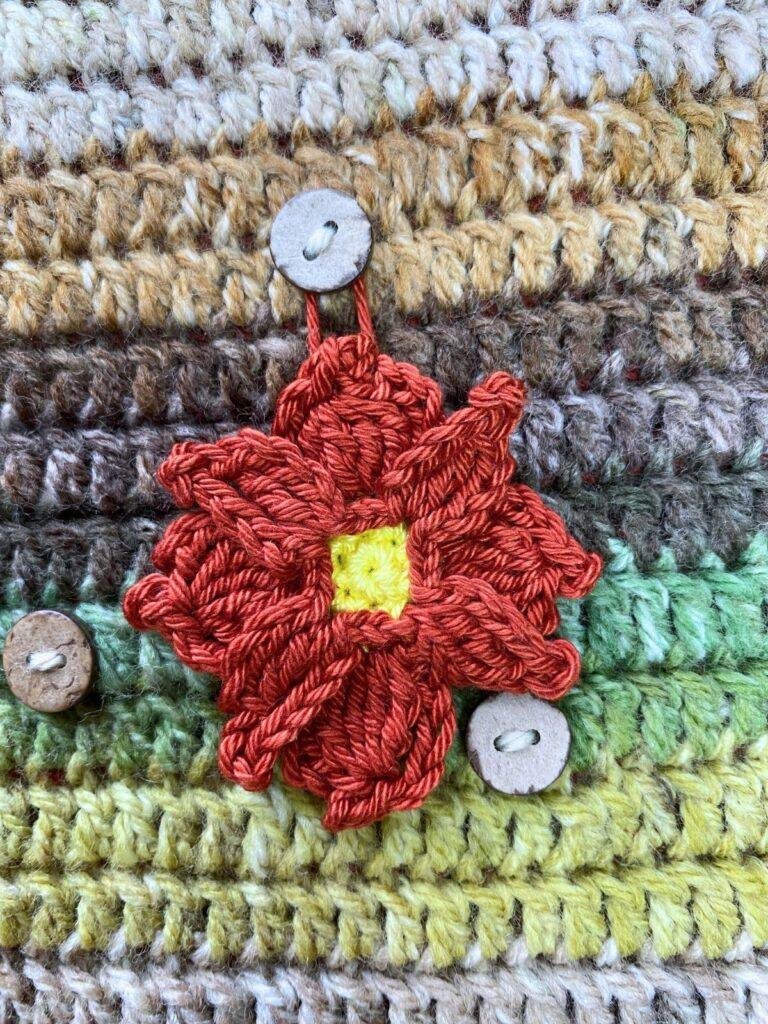
Sew your buttons onto the large tree randomly. These will be where the decorations will be hung so be sure to space them out, so they won’t overlap one another.
Sew your numbers onto the pockets (I did this randomly, but you can keep them in order if you prefer). Alternatively embroider or surface slipstitch the numbers onto the pockets.
ENVELOPE BORDER
Using Yarn A, the 4mm hook, and the right side of the blanket facing you, surface slip stitch loosely all the way around your blanket. Along the top and bottom on the blanket, you will be inserting your hook into the stitches as normal. Along the sides, your hook will go between the sc that we crocheted at the start and end of each row and the next st. Fasten off with an invisible join.
Round 1: Using Yarn A, starting on the back of your blanket, insert your hook into the back of any stitch of the surface slip stitch (this will just be a single loop and can be hard to see), ch2 (does not count as a st), dc in each ss around, making sure you work a ch2 between the 2 stitches at each corner, ss in the top of the first st to join.
Round 2: ch1, sc in blo in each st around, making sc, ch1, sc in each ch2 corner space.
Rounds 3-4: ch1, sc in blo in each st around, making sc, ch1, sc in each ch1 corner space.
Rep Rounds 1-4 on the front side of your blanket, working into the front of your surface slip stitch (which will be 2 loops).
You now have an envelope. Join the front and back parts of the envelope together with a slipstitch join, working with the right side facing, making sure to enclose all of the ends. Join using the back loop of the front piece of the envelope and the front loop of the back piece.
Before you close up the top, insert your piece of dowelling into the envelope border, so that it sits inside the envelope and runs the whole width of the top of the wall hanging.
Hanging Decorations
To make the 24 hanging decorations to go on your crochet Christmas tree wall hanging, you will now need to head to the individual blogposts for each decoration listed below:
- Star: https://concretegems.co.uk/simple-crochet-star-pattern
- Eucalyptus: https://concretegems.co.uk/crochet-eucalyptus-leaves
- Snowflake: https://concretegems.co.uk/easy-crochet-snowflake-pattern
- Dove: https://concretegems.co.uk/dove-crochet-pattern
- Tree: https://concretegems.co.uk/mini-crochet-christmas-tree
- Mistletoe: https://concretegems.co.uk/crochet-mistletoe
- Bell: https://concretegems.co.uk/christmas-bells-crochet-pattern
- Acorn: https://concretegems.co.uk/acorn-crochet-pattern
- Bauble: https://concretegems.co.uk/crochet-christmas-bauble-pattern
- Mittens: https://concretegems.co.uk/mitten-ornament-crochet-pattern
- Ivy leaf: https://concretegems.co.uk/crochet-ivy-leaf-pattern-free
- Wreath: https://concretegems.co.uk/mini-christmas-wreath-crochet-pattern
- Candle: https://concretegems.co.uk/crochet-candle-pattern
- Robin: https://concretegems.co.uk/robin-crochet-pattern
- Orange slice: https://concretegems.co.uk/crochet-orange-slice-pattern
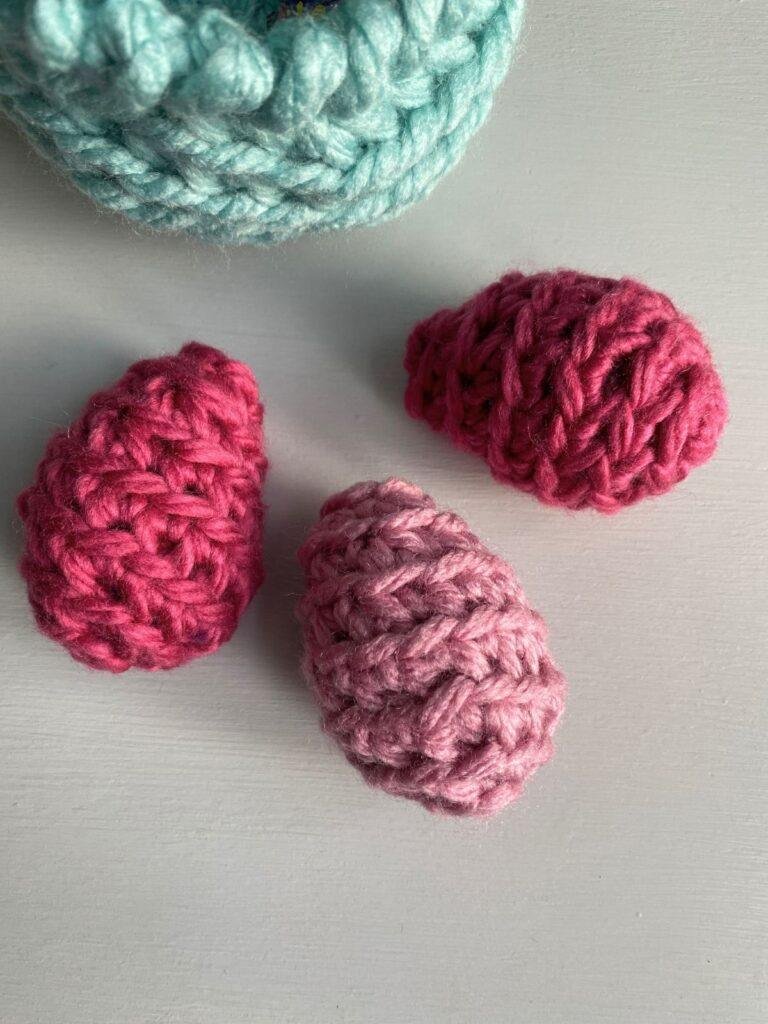
- Pinecone: https://concretegems.co.uk/crochet-pinecone-pattern
- Holly and Berries: https://concretegems.co.uk/holly-and-berries-crochet-pattern
- Gingerbread person: https://concretegems.co.uk/crochet-gingerbread-man-applique
- Santa hat: https://concretegems.co.uk/mini-crochet-santa-hat-pattern
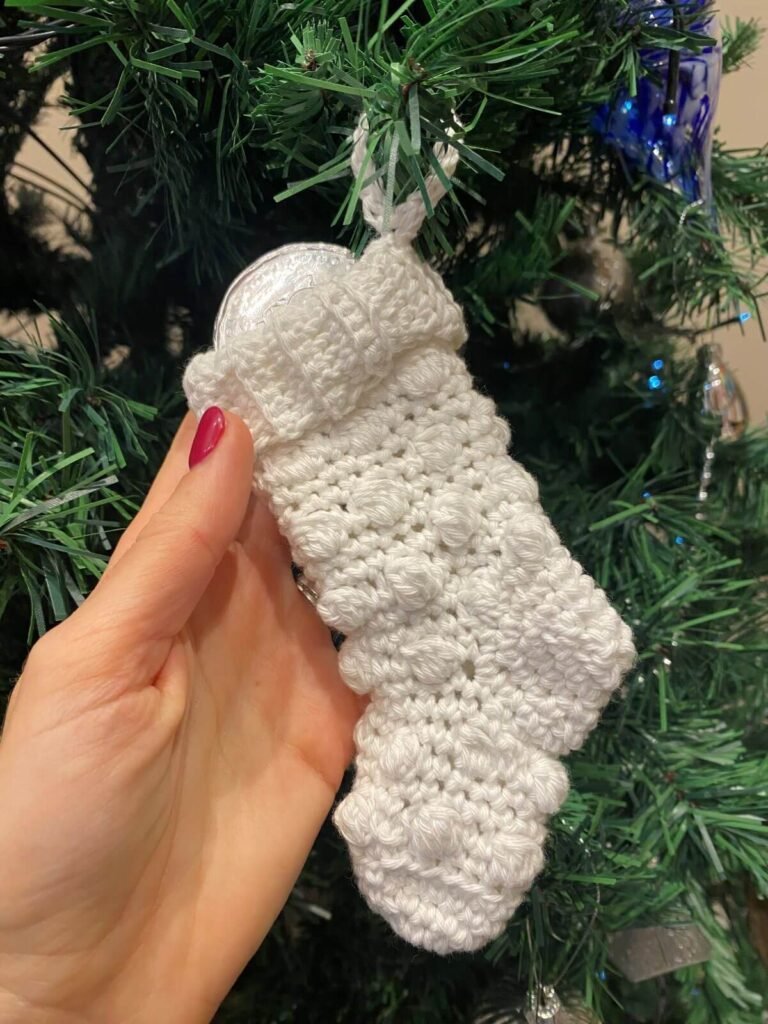
- Stocking: https://concretegems.co.uk/mini-crochet-christmas-stocking-pattern
- Poinsettia: https://concretegems.co.uk/poinsettia-crochet-pattern
- Present: https://concretegems.co.uk/crochet-christmas-present-ornament
- Toadstool: https://concretegems.co.uk/toadstool-crochet-pattern
- Bow: https://concretegems.co.uk/small-bow-crochet-pattern
Finishing Touches
Block the hanging decorations. Sew a hanger to the top of each decoration using leftover yarn or twine.
Place the decorations in the pockets on the wall hanging ready for Advent to start!
Check out my other crochet patterns for more crochet inspiration.
Pattern help
There is a lot more detail in the premium pdf pattern of the crochet advent calendar, including photos, stitch tutorials and mosaic crochet chart. Plus it’s your to print out and keep!
Also please do check out the stitch tutorials on my YouTube channel for extra guidance.
Get the ad-free pdf here!
Count down to Christmas in handmade style with this Woodland Advent Calendar crochet pattern! This complete pattern includes:🎄
24 unique hanging decorations – Star, Snowflake, Robin, Acorn, Toadstool, Gingerbread Person, Holly & Berries, Santa Hat, and many more.
🎄 Beautiful wall hanging design – the perfect way to display your makes throughout December.
🎄 Step-by-step video tutorials – follow along with clear instructions for every decoration, making it beginner-friendly.
🎄 Written patterns with photos – easy to follow for crocheters at an advanced beginner level and above.
If you are struggling with the pattern, please don’t hesitate to reach out.
Join the Concrete Gems Crochet Community for pattern support!
Find me on Facebook or Instagram @concretegemscrochet or drop me a message.
Copyright Notice
The Woodland Advent Calendar crochet pattern and all associated images are the intellectual property of Concrete Gems. It is strictly prohibited to share, copy, alter, or distribute this pattern in any form.
You are welcome to sell finished items made using this pattern on a small scale, provided you give design credit to @concretegemscrochet. Thank you for respecting the effort and creativity that went into creating this design.
What next?
I’ve absolutely adored designing this crochet advent calendar pattern for you and hope you have had fun making it. I’m Gemma, a crochet tech editor, designer and overall crochet enthusiast. I’m also a mum of 3 kids, and enjoy running, reading, walking and crafting, but mostly crochet! I’m so happy to be able to bring my designs to you!
Sign up to my mailing list for the latest news, pattern releases and special offers here
If you enjoyed making your crochet Christmas tree advent calendar pattern, please consider sharing it to social media tagging @concretegemscrochet or come and join the Concrete Gems Crochet Community to share in the joy of crochet with me.
Other Christmas crochet patterns you might enjoy
If you enjoyed making this crochet advent calendar, then you might also like these free Christmas crochet patterns.
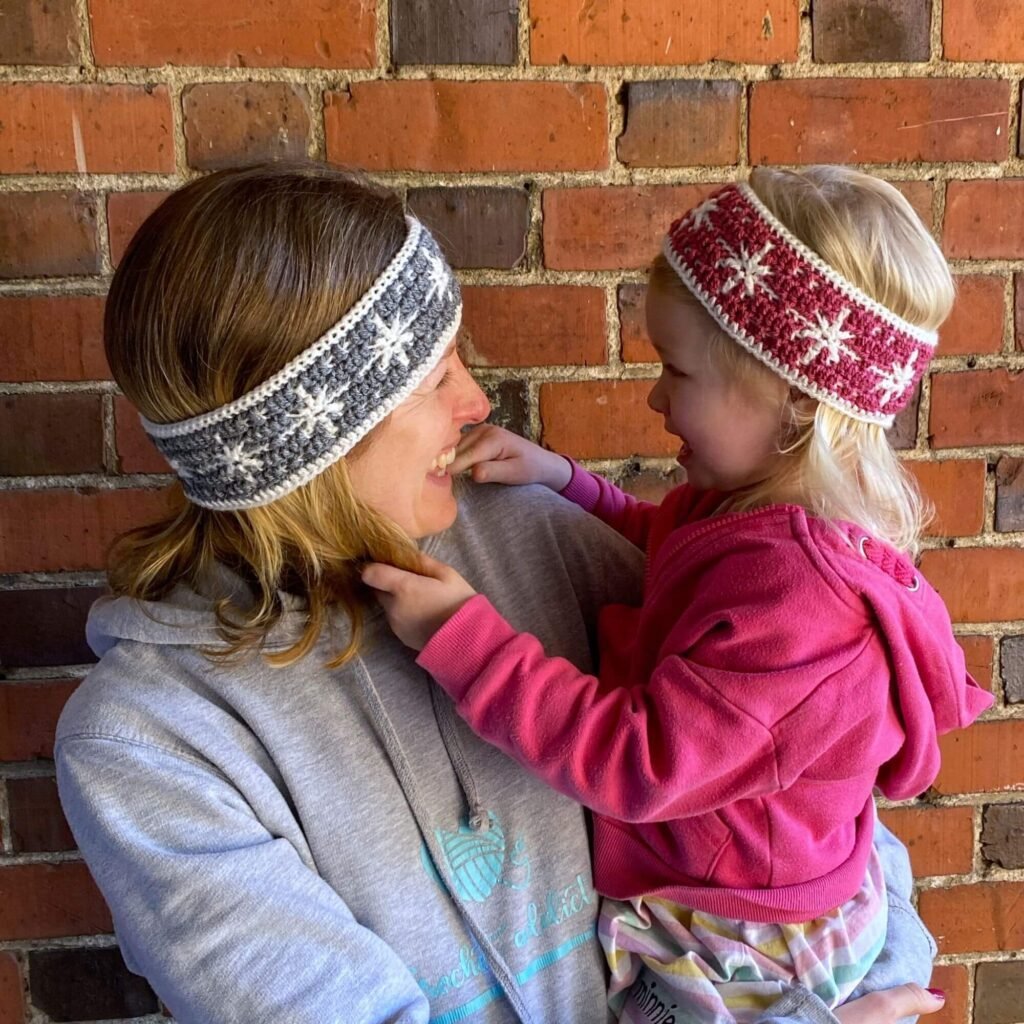
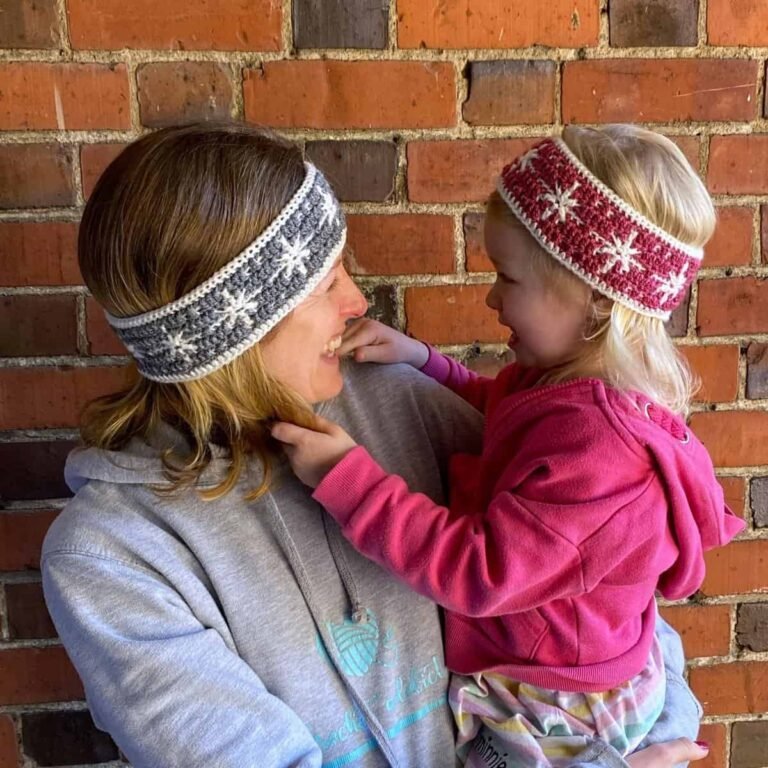
Snowflake headband crochet pattern – featuring beautiful snowflakes made using overlay mosaic crochet, this ear warmer is both fun to make and to wear. With sizes from baby to adult, this is a pattern the whole family can enjoy.
Mini chocolate stocking crochet pattern – these cute crochet stockings are perfect for hanging little chocolate treats on your Christmas tree. Much better than the expensive Christmas tree chocolates you get in the shops!
Thanks for reading and happy crocheting! 🧶
25 Comments