Most mosaic crochet patterns work row-by-row requiring you to cut your yarn every row, leaving you with hundreds of ends to sew in! But mosaic crochet center out is different: you start in the middle and work outwards in rounds to create beautiful crochet squares. Perfect for potholders, washcloths and blankets, this technique is as fun as it is eye-catching! And no ends!!
In this tutorial, you’ll learn all about mosaic crochet center out, as well as a practical guide on how to start a centre-out mosaic square, work the increases and tricky corners, and follow a chart as it grows. There’s also a video tutorial to help you with any tricky bits! By the end, you’ll be ready to start on square 1 of the blooming tiles blanket – or use this technique on any center out mosaic project.
Disclosure: This post may contain affiliate links. This means we may receive a commission if you click a link and make a purchase. However, this does not influence our product recommendations, which are based on honest reviews and genuine enthusiasm. Read my Privacy Policy for more information.
What is Mosaic Crochet Center Out (and How it’s Different)
Mosaic crochet center out is essentially worked the same as regular overlay mosaic crochet with one major difference. In mosaic crochet center we start in the center of a square and work in rounds around that center, increasing each round to form a square.
It can therefore also be called mosaic crochet in the round.
The only tricky part of this technique are the corners, and I go into them in detail below.
Traditional Overlay Mosaic Crochet vs Mosaic Crochet Center Out
Traditional overlay mosaic crochet:
- Worked in rows on the front of the project starting from a foundation chain.
- One colour per row.
- Fasten off yarn at the end of every row and re-join new colour at the start of the next row.
- Uses single crochet in the back loops only and Mosaic double crochet stitches, which are worked in the front loop of the stitch two rows below.
- Can be worked from written instructions or a chart.
Mosaic crochet center out:
- Worked in rounds from the center out, starting with a magic ring, working on the front of the project only.
- One colour per round.
- Carry the yarn up the back of the square.
- Uses single crochet in the back loops only and Mosaic double crochet stitches, which are worked in the front loop of the stitch two rounds below.
- Can be worked from written instructions or a chart.
- Makes crochet squares that can be joined.
Mosaic Crochet Center Out Tutorial Overview
- Stitch: Single crochet in back loop only and Mosaic double crochet stitches in the overlay mosaic crochet technique
- Skill level: Advanced beginner (confident with basic stitches and repeats) – recommended knowledge of overlay mosaic crochet in rows too!
- Style: detailed, decorative and stunning
- Yarn: Paintbox Yarns Simply DK
- Hook size: 4mm
- US terms: or upgrade for UK terms too!
- Perfect for: a blanket square, a potholder or washcloth!
Why Mosaic Crochet Center Out is Great for Blankets
There are so many benefits of working from the center out!
No need to cut your yarn each round – just carry it up the inside. This means there’s not a million ends to sew in, and no need for an envelope border.
It’s also super quick to start. You don’t need to make a huge foundation chain before getting to the fun bit.
It’s a great project to take out and about – you just need to take the square you’re working on, so it’s super portable.
You can decide how big you want your blanket to be as you work: you don’t need to decide at the start how wide it will be. Just keep making squares until you’ve run out of yarn or had enough! And then join them altogether.
Yarn
Paintbox Yarns Simply DK, 100% Acrylic, (276m/302yds, 100g/3.53oz)
You will need two different contrasting colours for your mosaic crochet square. A colour-changing yarn against a neutral can look amazing too.
I’d also recommend a 4.0mm Crochet Hook. Whilst you can use any weight of yarn and any hook for the purposes of this tutorial, I recommend DK yarn because it has enough detail to really show the design, without being too fiddly to see the stitches.
Yarn Alternatives
You can substitute for any that you prefer. Now is the perfect time to use yarn from your stash!
Here are a few alternative options:
- Brava Recycle, 100% Recycled Acrylic, (100g/3.5oz, 280m/306yds)
- Stylecraft Special DK, 100% Acrylic, (100g/3.5oz, 295m/323yds)
- Emu Classic DK, 100% Acrylic, (100g/3.5oz, 282m/308yds)
What Skills do I Need for this Mosaic Crochet in the Round Technique?
If you haven’t tried overlay mosaic crochet in rows before, I would recommend having a go at that first. Check out this overlay mosaic crochet video tutorial.
Overlay mosaic crochet uses the front loops and back loops to create a beautiful textured colourwork project. You work each alternate round in a different colour using a combination of two stitches: the single crochet in the back loops only; and the mosaic double crochet in the front loops only of the stitch two rounds below the current round. The single crochet will always be worked into a stitch of the other colour, whilst the mosaic double crochet stitches are worked into a stitch of the same colour.
When you work mosaic crochet in rows, you need to cut your yarn after each row. However this pattern is worked in the round, so you can just leave the yarn hanging behind your work, ready to be picked up again for the next round. This means less ends to sew in!!

What Special Crochet Stitches are Used to Make a Mosaic Crochet Square?
Magic Ring (MR)
The magic ring is a fantastic way to start crocheting in amigurumi, and any crochet in the round. It can be a bit complicated though, so do check out my magic ring YouTube tutorial for a visual guide.
- Lay the tail end of the yarn over your palm and wrap the ball end around your first 2 fingers. Cross the yarn over and hold that point with your thumb and forefinger.
- Pull the loop off your fingers, insert your hook into the hole and grab the ball end of the yarn with your hook.
- Pull the yarn back through the loop. At this point, readjust your hand so you are holding the yarn as you normally would.
- Put your middle finger and ring finger into the loop to hold it. Then yarn over and pull through to secure your ring.
You can then start crocheting into the ring in the normal way.
If you’d like to try mosaic crochet, you might like the reversible rainbow mosaic crochet blanket.
Mosaic double crochet (Mdc)
- Yarn over and insert your hook into the unworked front loop of the stitch from the row below the one you would normally work into (it will be the same colour as the yarn you are using).
- Yarn over and pull through.
- Yarn over and pull through two loops.
- Yarn over and pull through the remaining two loops to complete the stitch.
Mosaic Crochet in the Round
Working mosaic crochet in the round is similar to mosaic crochet in rows with a few differences.
When working Mdc in the corner stitches, the first and last 2 Mdc on each side will be worked into the same corner stitch. This is because we are working 2 rounds down and there is only 1 unworked front loop available to work into. If you have Mdc in the first and second stitch of the side, you will end up with 4 stitches worked in the corner loop 2 rounds down.
At the end of each round, you will slip stitch into the first st to join. You will then slip stitch with the new colour into the corner chain space to start the next round.
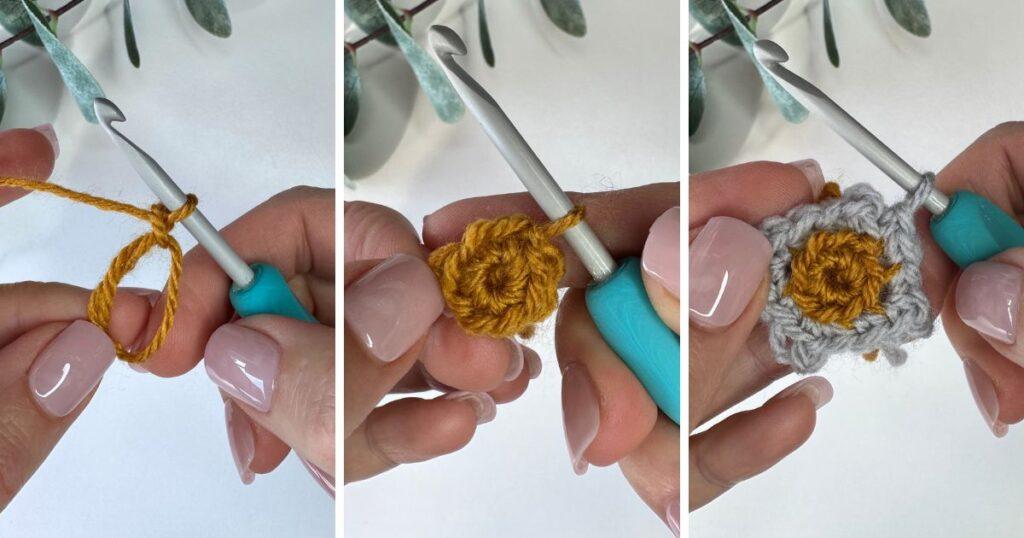
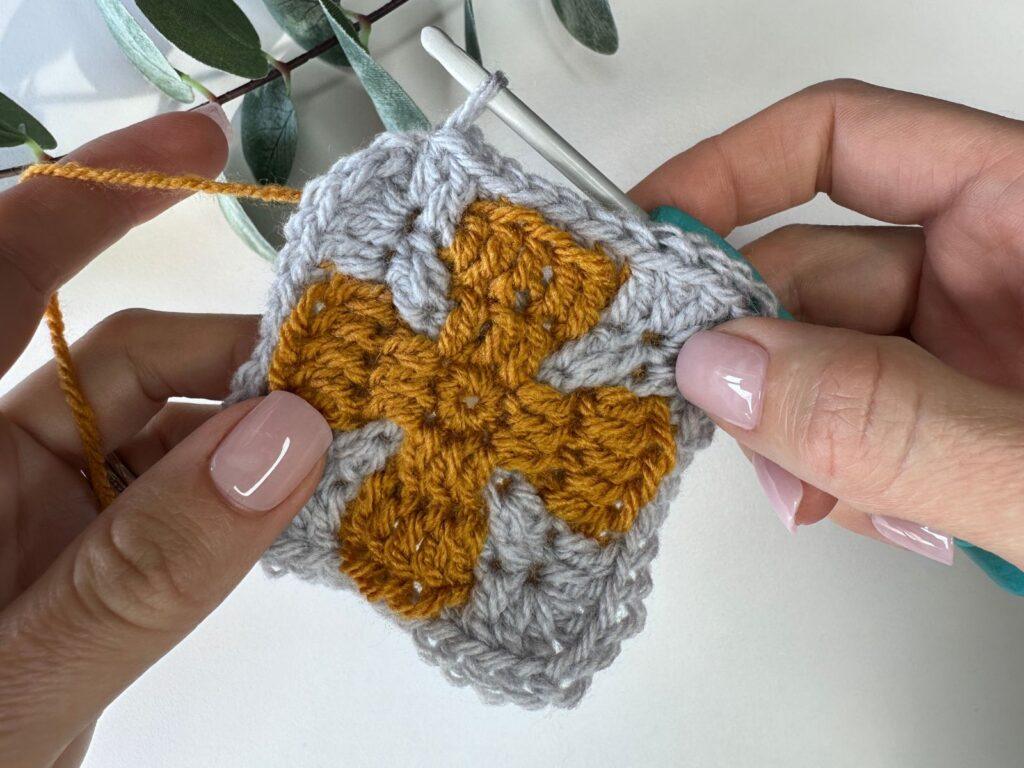
The Mosaic Center Out Technique: Step-by-Step
Phase 1 – Starting the Center
This is your foundation, and it doesn’t have to be perfect.
What you’re doing:
- Create a magic ring (see above for tutorial).
- Work 8 single crochets into the ring.
- Pull the ring closed and slip stitch to join.
- Place a stitch marker in the first stitch—you’ll come back to this when you join each new round.
Important: From Round 2 onwards, use stitch markers at all four corners – this is the foundation for keeping your square flat and your pattern aligned.
Phase 2 – Forming the Corners
In this round we create the corners of the square by working (single crochet, chain 1, single crochet) into the back loop only of the first stitch.
We then make a single crochet in the next stitch. And then repeat that around, creating 4 corners and 4 sides.
Phase 3 – Your First Increase (The Tricky Corners)
Now your square needs to grow, and this is where most makers struggle. We will also start making Mosaic double crochet stitches in the front loop of the stitch 2 rounds below where indicated in the pattern. All other stitches are single crochet in the back loops only.
The setup: Your pattern has 4 corners. At each corner, you’ll increase to keep the square from turning into a spiral. You’ve already marked these corners with stitch markers.
The critical corner technique: When you’re working mosaic double crochet stitches at a corner, both corner stitches go into the same corner chain space 2 rounds below. This is the key to keeping your pattern aligned and your corners clean. See MORE ABOUT THE DIFFERENT CORNERS BELOW.
What happens if you don’t work the corners correctly: You’ll have too many stitches to fit across a side, and your square will start to ruffle or the pattern will break down.
Working the Corners in Overlay Mosaic Crochet
The corners are definitely the trickiest part of this pattern, so I’ve included a guide on how to work the different types of corners.
sc, ch1, sc
In the back loop of the corner ch-sp, work a single crochet, chain 1, and then work another single crochet.
Mdc, ch1, Mdc
In the front loop of the corner ch-sp 2 rounds below, work a Mosaic double crochet, chain 1, and then another Mosaic double crochet.
2Mdc, ch1, 2Mdc
As Mosaic double crochet stitches are worked into the stitch 2 rounds below, you will find that there are not enough front loops to work the corner stitch and the one next to it into. Therefore they both need to go into the front loop of the corner ch-sp on each side. So you will end up with 4 Mdc in the same stitch. You will then need to skip a stitch before and after the corner on the current round.
The first corner: Mdc, ch1, 2Mdc
At the start of any round with 2Mdc in the corners, we begin with 1Mdc, chain 1, 2Mdc in the front loop of the ch-sp 2 rounds below. This is because the round starts in the stitch directly before the corner. We then add the other Mdc as the last stitch of the round in the same front loop of the corner ch-sp as the other 3 Mdc are.
Phase 4 – Following Your Chart or Written Instructions as It Grows
This is where the magic happens.
What’s happening:
- Each round is a new round on your chart or in the written instructions.
- You follow the single crochet back loop / mosaic double crochet pattern exactly as shown.
- Your crochet square grows to match.
How to read as you expand:
- Look at Round 2 on your chart—count the total stitches.
- Work that many stitches in Round 2, following which stitches are single crochet back loop and which are mosaic double crochet (2 rounds below).
- After you finish Round 2, stop and check: Hold your crochet square next to the chart. Does the stitch count match? Does the pattern match?
- If yes, move to Round 3. If no, recount—usually it’s off by 1 stitch at the corners. Easy fix now.
- Repeat this check every 2–3 rounds, not just at the end
Why this matters: Catching a stitch count error on Round 3 takes 5 minutes to fix. Catching it on Round 10 takes 30 minutes. Check early and often.
Prefer a Video Tutorial?
If you prefer crocheting from a video tutorial, watch as I show you how to crochet the blooming tiles mosaic crochet blanket:
Join the Concrete Gems Crochet Community for pattern support!
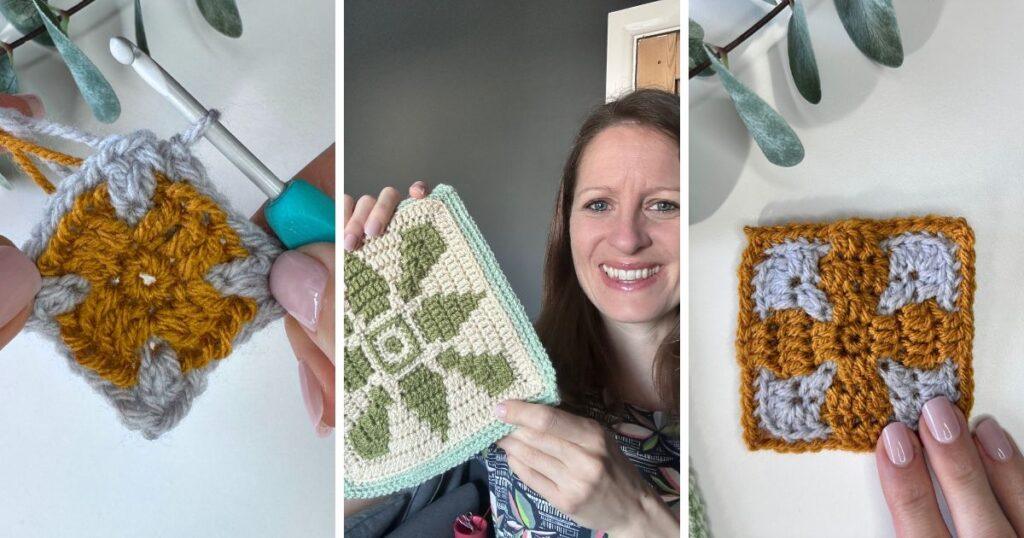
The Mosaic Crochet Center Out Technique
Below you will find a mosaic crochet stitch chart and underneath that the corresponding written instructions. Have a go at following them to make your first center out mosaic crochet square.
US Terminology.
Decide on your main motif colour (yarn A) and background colour (yarn B).
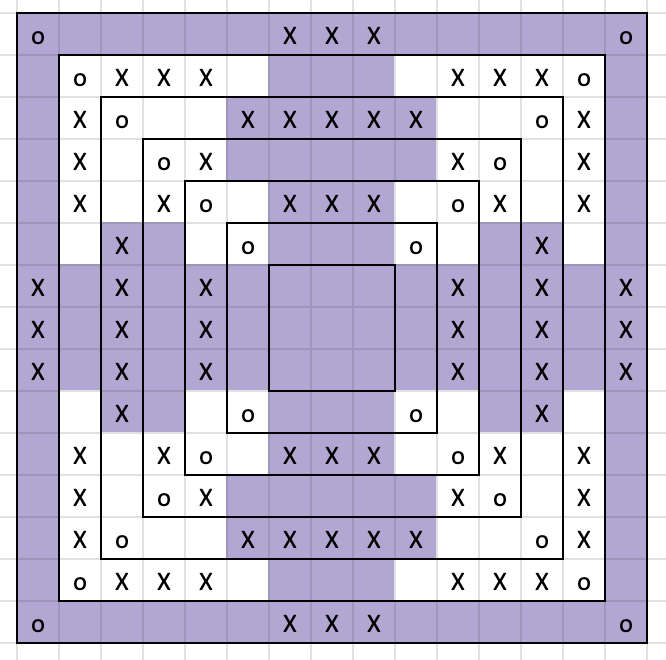
Chart Key
- Work a single crochet for each square unless it contains a symbol:
- X Work a Mosaic double crochet stitch (Mdc) into the front loop of the stitch 2 rounds below
- o This is the corner chain 1 space that each subsequent corner stitches are made into.
The central 9 squares of the grid (in pink) represent a magic ring in the centre and the 8 stitches around that from Round 1, which are always single crochet into the magic ring.
After that, we alternate colours each round.
In each corner we either work (single crochet, chain 1, single crochet) into the back loop of the chain stitch or (Mosaic double crochet, chain 1, Mosaic double crochet) into the front loop of the chain stitch. When we work Mosaic double crochet stitches in the corner, they are worked into the front loop of the chain stitch 2 rounds below.
When there are also Mosaic double crochet stitches into the second stitch on a side, these are also worked into the same front loop of the chain stitch.
Quick Stitch Count Reference
- Round 1: 8 sts
- Round 2: 12 sts
- Round 3: 20 sts
- Round 4: 28 sts
- Round 5: 36 sts
- Round 6: 44 sts
- Round 7: 52 sts
Mosaic Crochet Square Written Instructions
Using yarn A, make a magic ring.
Round 1: A: 8sc in MR, slst in first st to join. [8]
Round 2: B: join yarn B with a slst, *(sc in blo, ch1, sc in blo) in next st, sc in blo in next st, rep from * around, slst in first st to join, slst in ch-sp and change to A. [12]
Round 3: A: *(sc, ch1, sc) in blo of corner ch-sp, Mdc in next 3 sts, rep from * around, slst in first st to join, slst in ch-sp and change to B. [20]
Round 4: B: *(Mdc, ch1, Mdc) in corner ch-sp, sc in blo in next 5 sts, rep from * around, slst in first st to join, slst in ch-sp and change to A. [28]
Round 5: A: *(sc, ch1, sc) in blo of corner ch-sp, sc in blo in next st, Mdc in next 5 sts, sc in blo in next st, rep from * around, slst in first st to join, slst in ch-sp and change to B. [36]
Round 6: B: (Mdc, ch1, 2Mdc) in corner ch-sp, *Mdc in next st, sc in blo in next 5 sts, Mdc in next st, (2Mdc, ch1, 2Mdc) in corner ch-sp, rep from * 2 more times, Mdc in next st, sc in blo in next 5 sts, Mdc in next st, Mdc in corner ch-sp, slst in first st to join, slst in ch-sp and change to A. [44]
Round 7: A: *(sc, ch1, sc) in blo of corner ch-sp, sc in blo in next 4 sts, Mdc in next 3 sts, sc in blo in next 4 sts, rep from * around, slst in first st to join, slst in ch-sp. [52]
Fasten off.
How about trying another mosaic pattern? The Vintage mosaic crochet handbag pattern is quick and easy with a fun art deco style front.
Common Mistakes & How to Fix Them
My Square is Going Wonky
- Likely cause: Uneven increases or starting in the wrong place each round.
- Fix: Use stitch markers at all four corners. Increase at the corners, not randomly.
- Prevention: Mark corners with stitch markers from round 2 onwards.
My pattern doesn’t Match the Chart Anymore
- Likely cause: Missed a row or miscounted at the increases.
- Fix: Frog back to the last round where it was correct.
- Prevention: Check your chart or written instructions against your crochet every 2–3 rounds, not just at the end.
There Seem to be too Many Stitches to Fit Across a Side
- Likely cause: Mosaic double crochet stitches not worked into the corners correctly.
- Fix: Frog back to the last round where it was correct.
- Prevention: When the first 2 stitches of a side are Mosaic double crochet, these both go into the same corner chain space 2 rounds below.
The Mosaic Double Crochet Loops Seem to be Gaping
- Likely cause: Tension is probably too loose either overall or just on certain stitches.
- Fix: Adjust your hook size to get a better look (be sure to still meet gauge).
- Prevention: Practice keeping an even tension throughout.
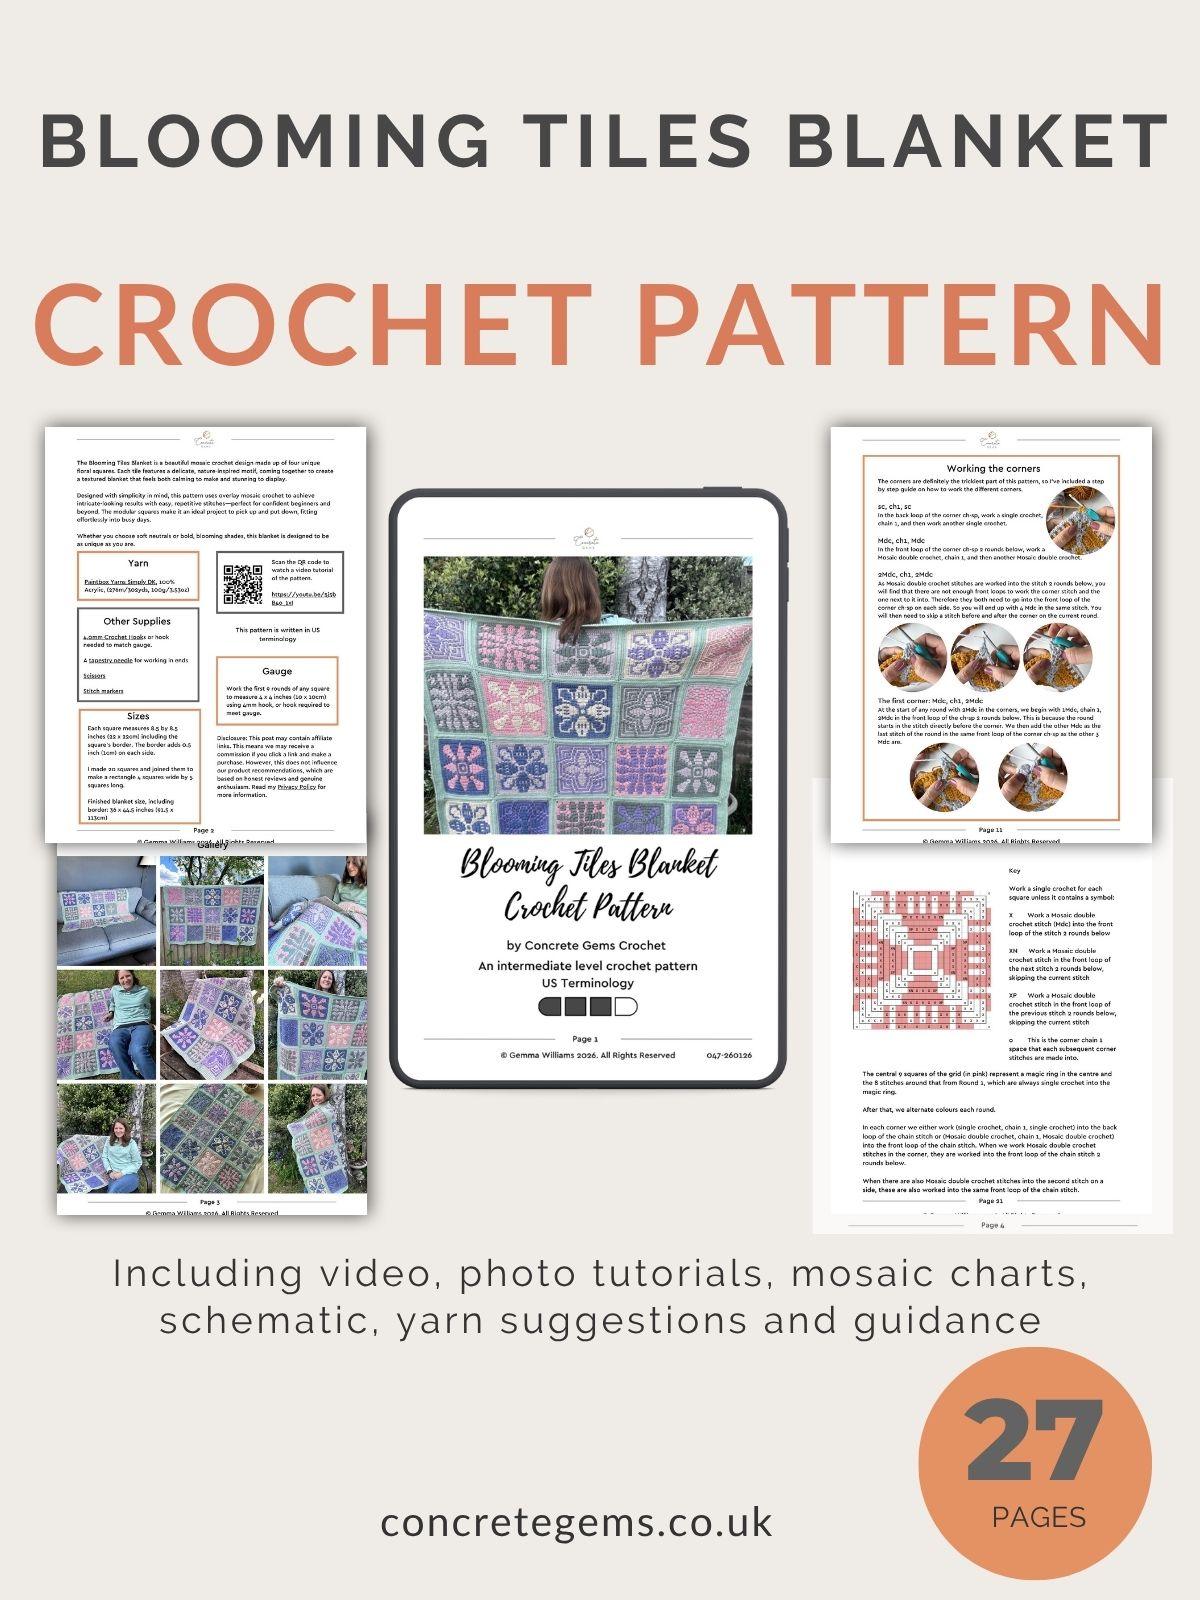
Mosaic Squares Crochet Pattern to Try
Grab the premium PDF and create the Blooming Tiles Blanket — a beautifully textured, floral mosaic crochet design that’s calm, creative, and a joy to make.
What You Get
✨ Ad-free, printable PDF in UK and US terms — instant download
🌸 Four unique floral square designs, worked in the round
🧶 Mosaic crochet technique with no sewing in ends
📊 Mosaic charts for each square for visual learners
🎥 Supporting video tutorials to guide you along the way
📐 Blanket schematic, colour placement ideas, and layout options
💛 A relaxing, modular project you can pick up and enjoy anytime
If you prefer to crochet square by square on the blog, find the mosaic crochet square 1 or this mosaic crochet square 2.
Check out my other crochet patterns too for more crochet inspiration.
Find me on Facebook or Instagram @concretegemscrochet or drop me a message.
If you enjoyed learning all about mosaic crochet squares made from the center out, please consider sharing it to social media tagging @concretegemscrochet or come and join the Concrete Gems Crochet Community to share in the joy of crochet with me.
Ready to Start?
You have everything you need. The technique is straightforward, the payoff is huge (no yarn cutting!), and your finished square will be beautiful.
Next step: Head to Square 1 of the Blooming Tiles Blanket and cast on. Or try square 2 of the mosaic crochet blanket.
Some Crochet Patterns you Might Enjoy
If you enjoyed learning this overlay mosaic crochet technique, then you might also like these mosaic crochet patterns:
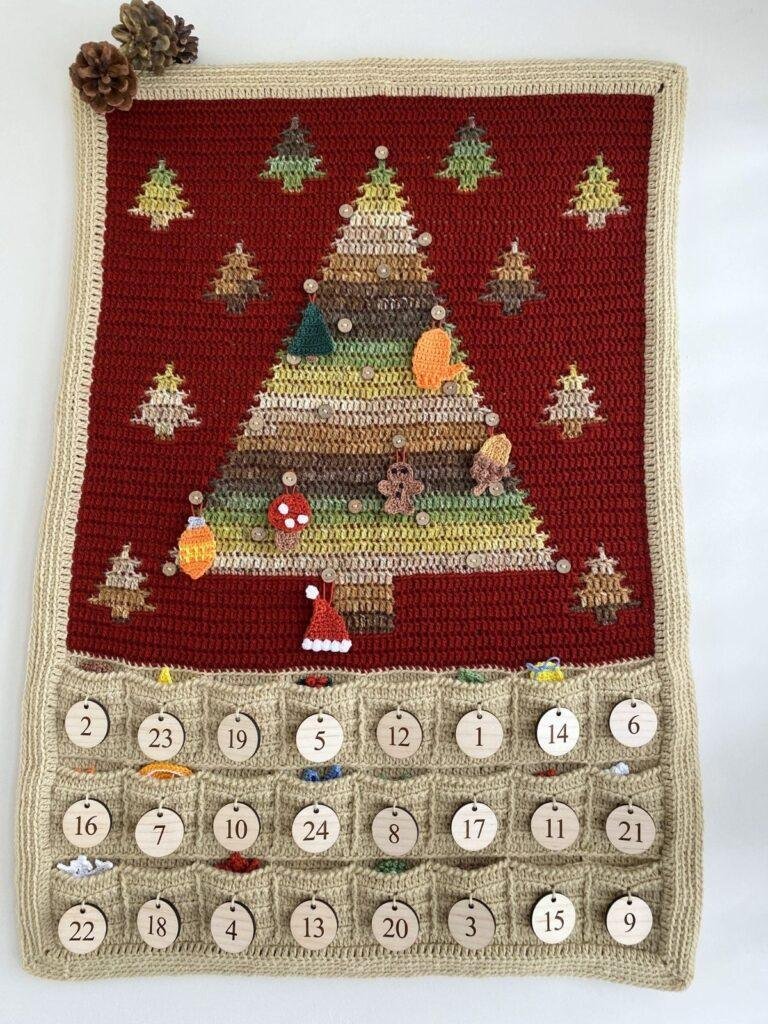
- Woodland advent calendar pattern – with 24 motifs to hang on a mosaic crochet Christmas tree.
- Mosaic crochet pumpkin strip – perfect for adding to a blanket.
- crochet shoulder bag – with a cute sheep motif on the front.
Thanks for reading and happy crocheting! 🧶