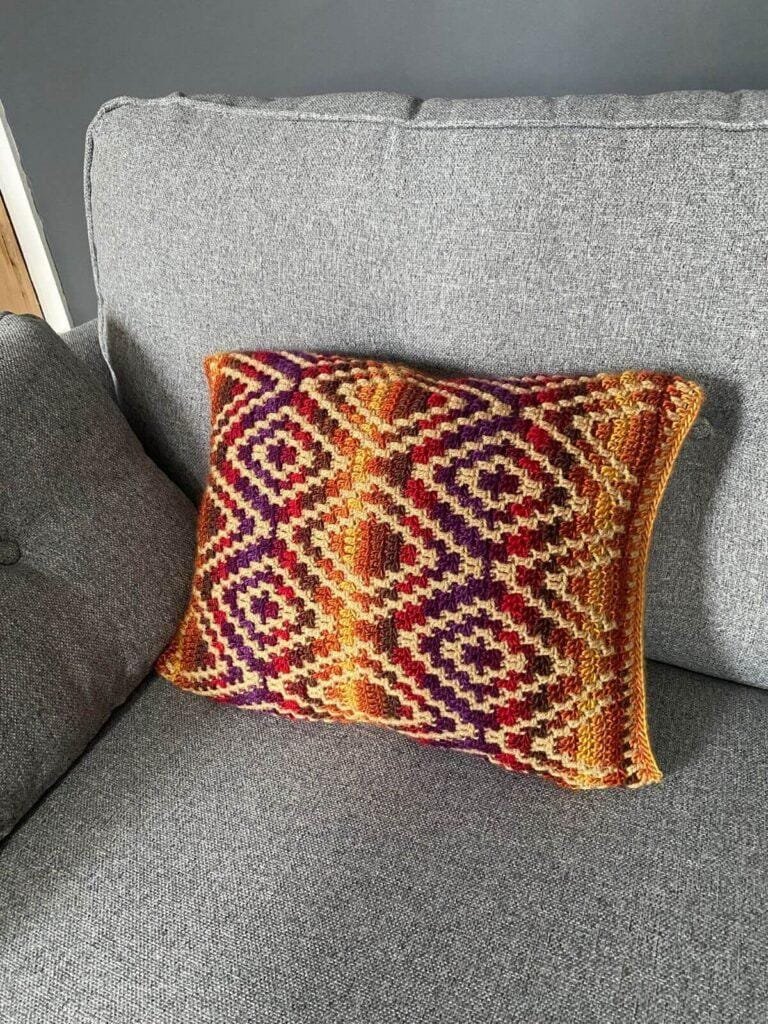
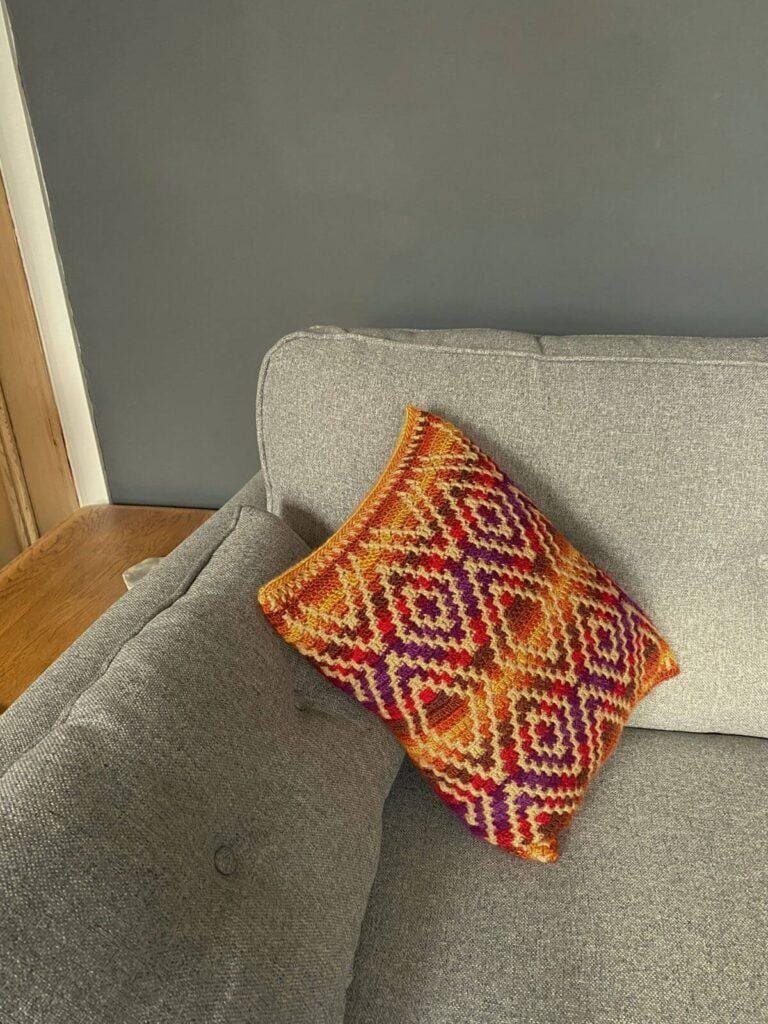
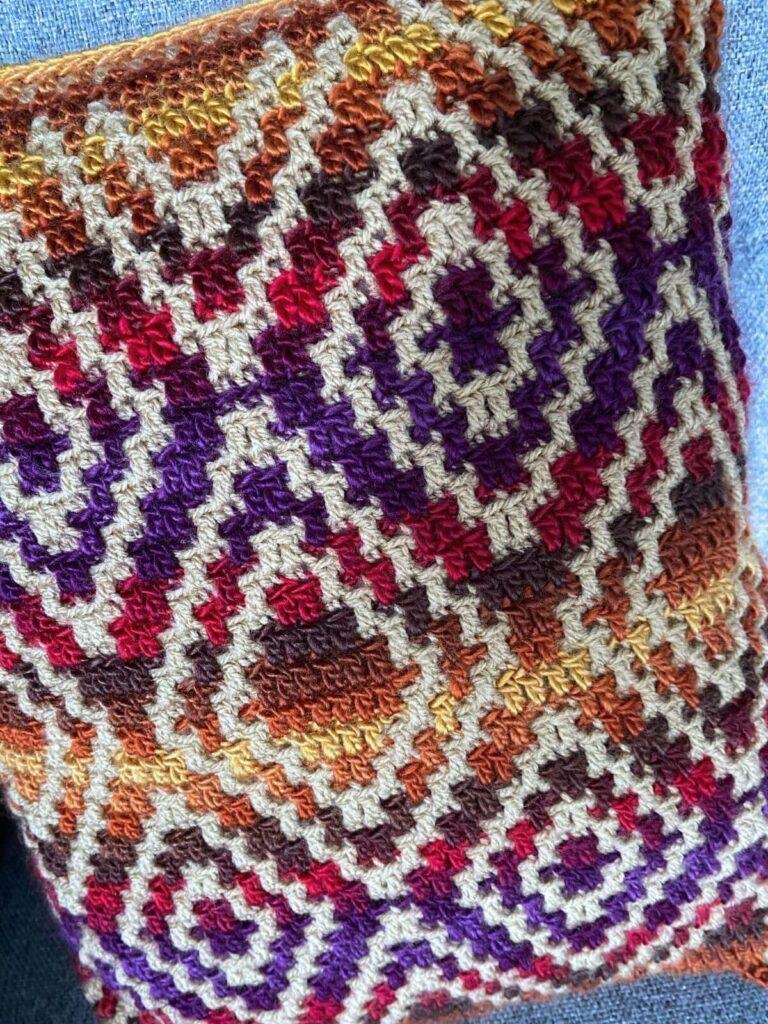
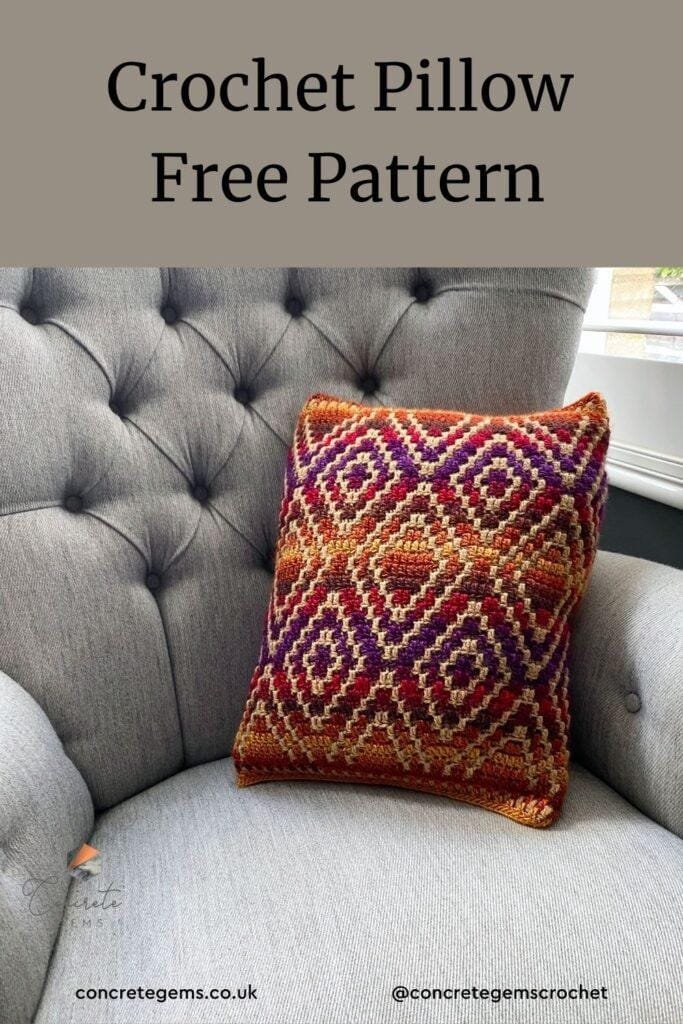
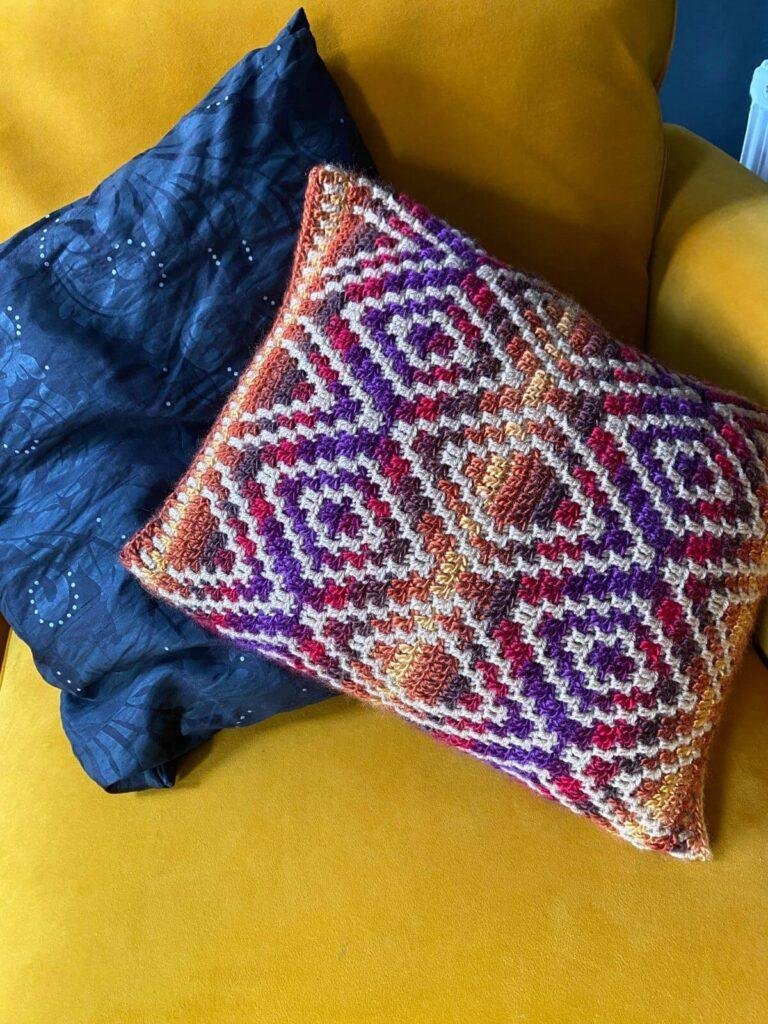
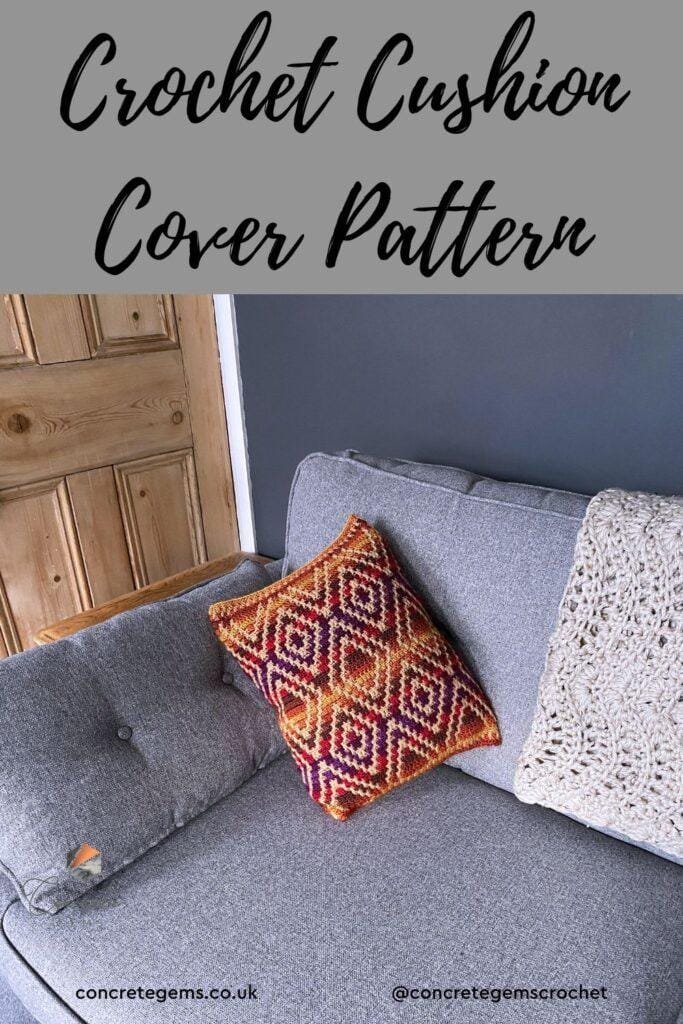
Are you looking for an easy crochet cushion cover free pattern to refresh your home décor? The Global Pathways Cushion is the perfect project! This modern crochet cushion cover features a bold geometric diamond design inspired by travelling around the world.
With bright contrasting colours, this cushion will add a unique and stylish touch to any room. Or why not change up the colours and create a cushion to match your own home. It would also make a great gift!
Designed with adventurous beginners in mind, this pattern includes clear, step-by-step instructions to help you create a stunning cushion cover with ease. There’s also a video tutorial to help you on your way!
Disclosure: This post may contain affiliate links. This means we may receive a commission if you click a link and make a purchase. However, this does not influence our product recommendations, which are based on honest reviews and genuine enthusiasm. Read my Privacy Policy for more information.
I originally designed this pattern as a blanket, with lots of different pathways, chevrons and geometric patterns. This was to represent the many different routes through life that we all take, both physically and metaphorically. And also a nod to my year abroad, where I travelled the world along many different pathways!
But once I’d taken a step back, I realised that something a lot simpler would suit it better. Not only from an aesthetic perspective, but also in the meaning behind it!. So I extracted one of the patterns from my chart and went with that.
For me, that meaning was this: Whilst the world is enormous and we are all so different living very different lives, we are also all so very similar. We are all essentially walking the same global pathways, trying to find our best way through life!
And this really resonated with me, which is why I’m so happy to share this pattern with you!
How is the Crochet Cushion Cover Made?
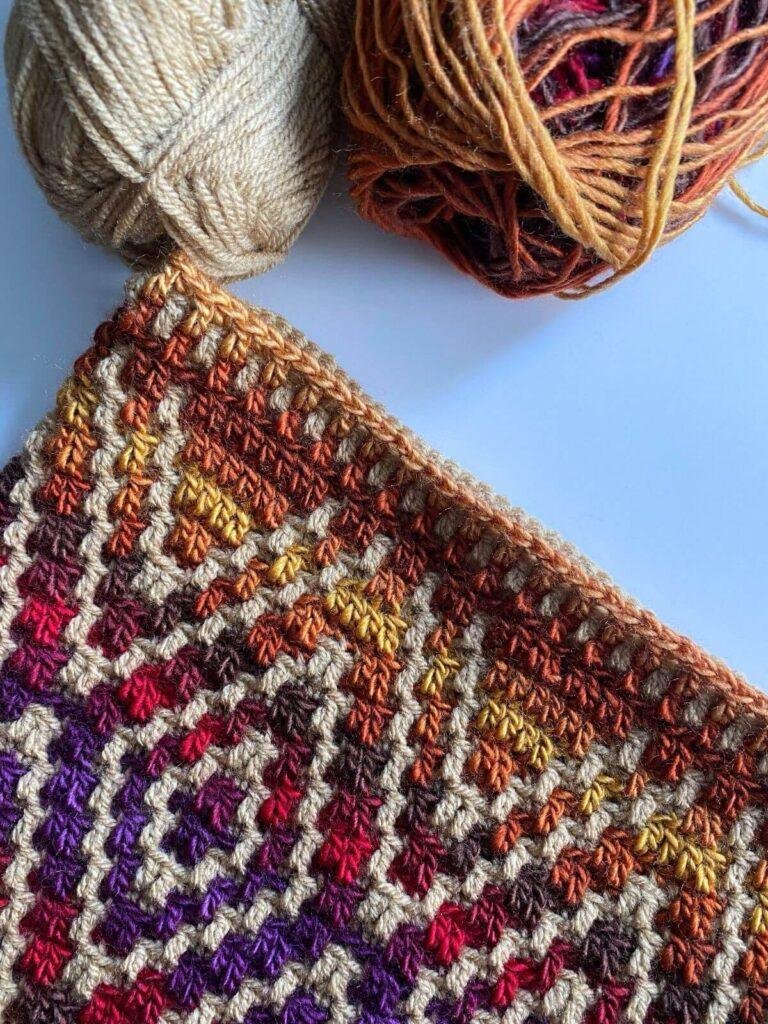
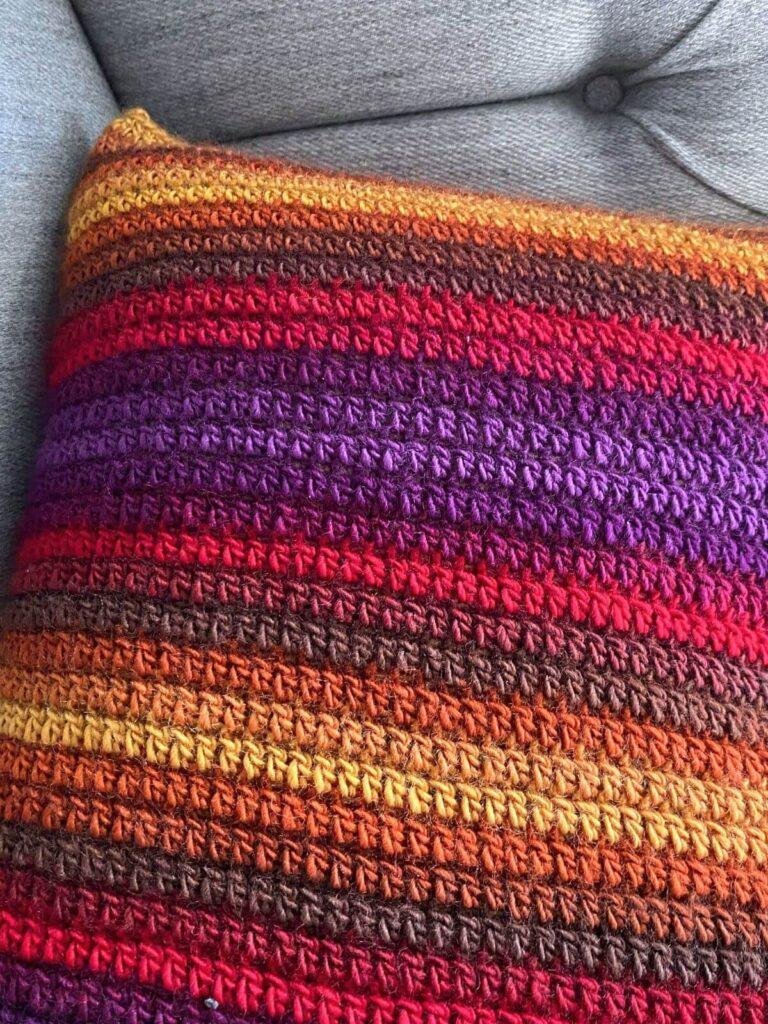
The Global Pathways Cushion is designed using overlay mosaic crochet in the round.
Overlay mosaic crochet is a beautiful crochet technique, which uses only single and double crochet stitches to create amazing designs.
This is achieved by working into the back loops and front loops of different stitches. You work each alternate round or row in a different colour using a combination of two stitches: the US single crochet in the back loops only; and the US double crochet in the front loops only of the stitch two rows/rounds below the current round or row.
The single crochet will always be worked into a stitch of the other colour, whilst the mosaic double crochet stitches are worked into a stitch of the same colour as the one you are using. Amazingly though, we will only use one colour per round or row.
Click here to watch a tutorial on overlay mosaic crochet.
Overlay mosaic crochet is worked from right to left (for a right-handed crocheter) on the front of the work only. This means you would normally need to cut your yarn at the end of each row, and therefore have lots of ends.
Luckily for us, we’re working in the round so we can carry our yarn up the inside of the join.
You will need:
Any DK or light worsted weight yarn in 2 colours (a solid colour and a multi-coloured yarn). I used 1 ball of World of Yarn Manarola Yarn, 100% Acrylic (100g/3.5oz, 240m/262yds) in Autumn (03) (Yarn A) and 1 ball of Hobbii Daily Stitch Acrylic DK, 100% Acrylic (100g/3.5oz, 350m/382yds) in Wheat (04) (Yarn B)
4.0mm Crochet Hook or hook needed for your yarn – I used the Furl Streamlined hook.
A tapestry needle for working in ends
Cushion insert 14in x 16in (35cm x 40cm)
Yarn Alternatives
There are so many options for yarn for your Global Pathways Cushion. I love the use of a multi-coloured yarn, but using 2 solid colours would also look fantastic.
Here are a few alternative options:
Multi-coloured yarn (Yarn A):
King Cole Riot DK, 70% Acrylic 30% Wool, (100g/3.53oz, 294m/322yds)
Hayfield Spirit DK, 80% Acrylic 20% Wool, (100g/3.53oz, 345m/377yds)
Solid yarn (Yarn B):
Hayfield Bonus DK, 100% Acrylic, (100g/3.53oz, 280m/306yds)
Brava Recycle, 100% Recycled Acrylic, (100g.3.53oz, 289m/306yds)
Sizing
The Global Pathways Cushion measures 12.25in x 17in (31cm x 43cm) when laid flat. This will fit a 14in x 16in (35cm x 40cm) cushion insert.
How to get the pattern
There are a few different ways that you can get your crochet Cushion Cover pattern.
You can carry on scrolling down and read the pattern for free on the blog in US crochet terms. The blog has ads on it, which is how I am able to offer it for free. Please do bookmark the page and come back to it as you work on your pattern though, rather than trying to print it out. Spending time on this page is how I get paid.
Alternatively you can purchase a premium pdf version of the pattern, which includes stitch tutorials, links to lots of video tutorials and full explanations. The premium pattern comes in US and UK terms. And of course, if you purchase the pattern, it is yours to keep, print and make notes on too.
PLEASE NOTE: The premium pattern is a pdf crochet pattern, written in English. It is not a finished project. You will receive a digital download upon completion of purchase.
Included in the premium pattern:
- A 15 page downloadable PDF with easy-to-follow instructions
- Detailed stitch guides and tips for perfect results
- Yarn recommendations and size adjustments
- Pattern support if needed
- An accompanying video tutorial
Difficulty level is Easy
Tension:
18 sts and 18 rows of mosaic double crochet = 4in x 4in (10cm x 10cm)
To measure your tension, create a sample swatch, using mosaic crochet.
If your swatch is bigger than the tension given, try with a smaller hook size. If your swatch is smaller than the tension given, try with a larger hook size.
Creating the Perfect Cushion Cover for you
The cushion is designed to fit a 14in by 16in rectangular cushion insert. If you would prefer your cushion to fit a square 12in x 12in (30cm x 30cm) or 13.75in x 13.75in (35cm x 25cm) cushion insert, there are 2 options.
- After the foundation Round 1, work Rounds 6 to 72. This will still give you a rectangle but it will stretch over the cushion insert nicely to fit. This would work well with a 13.75in x 13.75in (35cm x 35cm) cushion insert.
- After the foundation Round 1, work Rounds 12 to 66. This will produce a square cushion cover measuring 30cm by 30cm exactly. This would work well with a 12in x 12in (30cm x 30cm) cushion insert.
If you prefer to have the geometric pattern on both sides of your cushion, repeat the first 18 sts 6 times instead of 3. This version will require more of Yarn B.
Abbreviations
blo – back loops only
ch(s) – chain(s)
Fsc – foundation single crochet
mdc – mosaic double crochet
rep – repeat
RS – right side
sc – single crochet
sk – skip
ss – slip stitch
st(s) – stitch(es)
WS – wrong side
[…] – stitch count
* – repeat the instructions from * around
Pattern Notes
- Read through the pattern completely before starting and refer to the stitch tutorials as needed.
- Ch1 does not count as a stitch throughout.
- You will be joining each round with a ss into the first stitch of that round. Then, you will pull the new colour through the ss loop on your hook with the ch1. Make sure to pull the previous colour tight to hide that extra loop. To make sure the join is properly hidden, when you are finishing with an mdc, you can insert your hook into the required front loop and then also into the first stitch of the round before completing the mdc as usual.
- Do not cut your yarn at each colour change, but leave it to re-join on the next round.
- Stitch counts are given in this pattern in [ ] at the end of each round. Where no stitch count is given, it is the same as the previous round.
- There is a stitch chart included in the premium PDF Pattern, showing the front side of the cushion (sts 1-54) if you prefer to use a chart over written instructions for that section. Each round on the stitch chart should be read from right to left (for right-handed crocheters). Rounds are read from bottom to top.
- This tutorial is written for right-handed crocheters. If you are left-handed, you will be working from left to right around the cushion. Because the pattern repeats, you should be able to follow the pattern as it is. Alternatively you can follow the chart only, reading it from left to right, but you will not be able to switch between both the written pattern and the chart together.
- The last 54 sts of each round are the back of the cushion. This is made with sc in blo for all Yarn B rounds, and mdc for all Yarn A rounds.
Special Stitches
Below are the instructions for all the special stitches you will need for your easy crochet cushion cover.
Mosaic double crochet (Mdc)
- Yarn over and insert your hook into the unworked front loop of the stitch from the round below the one you would normally work into (it will be the same colour as the yarn you are using).
- Yarn over and pull through.
- Yarn over and pull through two loops.
- Yarn over and pull through the remaining two loops to complete the stitch.
Foundation sc
A foundation sc allows you to create that first round of your project without using a chain. Watch a video of the foundation sc here.
- Start with a slipknot and ch2 (this does not count as a stitch).
- Insert hook in second ch from hook and pull through a loop.
- Yarn over and pull through one loop (this makes the chain part of your first Foundation sc).
- Yarn over and pull through both loops on your hook (this makes the sc part of your first Foundation sc).
- Insert your hook into the chain part of the previous stitch, going through the two top ‘v’ shape strands of the chain.
- Yarn over and pull through one loop (this makes the chain part of the Foundation sc).
- Yarn over and pull through both loops on your hook (this makes the sc part of the Foundation sc).
- Repeat steps 5 to 7.
Whip stitch
This is a simple way to sew your pillow closed at the end and I show you how to do it in this whip stitch video tutorial.
Pin this free Crochet Pillow pattern for later
Full-length Video Tutorial
If you prefer crocheting from a video tutorial, hop on over to my YouTube channel and watch how I crochet a sample of this free cushion cover pattern.
The video will take you through all of the steps necessary to make your geometric cushion, including how to do overlay mosaic crochet, finishing techniques and tips.
Free Crochet Cushion Cover Pattern
US Terminology.
To unlock the free, exclusive content from Concrete Gems Crochet, all you have to do is enter your email address and create a password in the box below.
Every time you see Grow Exclusive Content from then on, you will be able to log in with your username and password and view the content. This also applies on other blogs, who use Grow.
Thank you for subscribing! I hope you enjoy the free patterns on this site. I can’t wait to see what you create! Please do share your crochet makes tagging @concretegemscrochet
Round 23: with Yarn A, ch1, *2sc in blo, mdc, (2sc in blo, 2mdc) twice, 2sc in blo, mdc, 2sc in blo, 2mdc, rep from * 3 times, mdc in each st to end, ss in blo of first st to join.
Round 24: with Yarn B, ch1, *sc in blo, mdc, 2sc in blo, mdc, 6sc in blo, mdc, 2sc in blo, mdc, 3sc in blo, rep from * 3 times, sc in blo in each st to end, ss in blo of first st to join.
Round 25: rep Round 23.
Round 26: rep Round 22.
Round 27: rep Round 21.
Round 28: rep Round 20.
Round 29: rep Round 19.
Round 30: rep Round 18.
Round 31: rep Round 17.
Round 32: rep Round 16.
Round 33: rep Round 15.
Round 34: rep Round 14.
Round 35: rep Round 13.
Round 36: rep Round 12.
Round 37: rep Round 11.
Round 38: rep Round 10.
Round 39: rep Round 9.
Round 40: rep Round 8.
Rounds 41-72: rep Rounds 9-40.
Round 73: with Yarn A, ch1, *sc in blo, 2mdc, sc in blo, 8mdc, sc in blo, 2mdc, sc in blo, 2mdc, rep from * 3 times, mdc in each st to end, ss in blo of first st to join.
Round 74: with Yarn B, ch1, sc in blo in each st to end, ss in blo of first st to join.
Round 75: rep Round 3.
Round 76: rep Round 4.
Round 77: rep Round 3.
Continuing with your yarn, lay your cushion flat and line up the stitches, so that the pattern will be on the front of your cushion and the plain stitches on the back, ss through both sides of your cushion in blo to close one end.
Fasten off and weave in all ends.
Block lightly to shape.
Put in your cushion insert, then use a whip stitch to close the seam. Alternatively, you can add a zip.
Check out my other crochet patterns for more crochet inspiration.
Pattern help
There is a lot more detail regarding the special stitches in the crochet cushion cover premium pdf pattern, including images and a chart. Also please do check out the stitch tutorials on my YouTube channel for extra guidance.
If you are struggling with the pattern, please don’t hesitate to reach out.
Find me on Facebook or Instagram @concretegemscrochet or drop me a message.
The Global Pathways Cushion crochet pattern is the intellectual property of Concrete Gems. It is strictly prohibited to share, copy, alter, or distribute this pattern in any form.
You are welcome to sell finished items made using this pattern on a small scale, provided you give design credit to @concretegemscrochet. Thank you for respecting the effort and creativity that went into creating this design.
What next?
I’ve really loved designing this easy crochet cushion cover for you and hope you have had fun making it. I’m Gemma, a crochet tech editor, designer and overall crochet enthusiast. I’m also a mum of 3 kids, and enjoy running, reading, walking and crafting, but mostly crochet!
Sign up to my mailing list for the latest news, pattern releases and special offers here
If you enjoyed making your crochet cushion, please consider sharing it to social media tagging @concretegemscrochet
Other crochet patterns you might enjoy
- Small Crochet Handbag Pattern – with a geometric art deco front
- Mouse Crochet Pattern – a cute little mouse amigurumi called Munchkin
- Crochet Love Heart – delicate, versatile and quick
Check out my other patterns here.
Thanks for reading and happy crocheting! 🧶

Hello, I’m looking at your “Easy Crochet Cushion Cover” free pattern dated Feb. 4, 2025. In the Notes section it states: “There is a stitch chart at the end of the pattern, showing the front side of the cushion (sts 1-54) if you prefer to use a chart over written instructions for that section. Each round on the stitch chart should be read from right to left (for right-handed crocheters). Rounds are read from bottom to top.”
I’ve looked over this page forwards, backwards, and every which way, but I can’t find a Stitch Chart.
Hi, thanks for your comment. Unfortunately the chart is a premium feature, available in the premium pdf. Apologies for the confusion.
perfect timing and exactly what I’m looking for! Love mosaic and you make it easy.
Was the length of the color way a factor in deciding the dimensions?
I’d like to make a larger, longer pillow. Any tips for increasing the size (in both directions)?
Thanks so much!
Ah thank you! The length of the project was really determined by the size of the cushion insert. But you can definitely adjust it. The pattern repeat is 18 stitches wide, so any multiple of that will work and then for the length you can repeat rounds 9-40 in the middle as many times as you want. There are other customisation options mentioned in the pattern too! I hope that helps!
I’m trying to get today’s pattern, August 30. It saying thank you for downloading it ,but I don’t see it anywhere..
I’ve sent it you by email, so you should have it now. Sorry that you were having problems with it.